I have moved all my blogs to my new website: https://helpfulofficetips.com/2015/08/31/adding-my-signature-to-a-letter-for-emailing/
From now on, all updates will be at the
new site, and all links will take you directly to that site. Please check
it out!
What’s a Signature Block?
First, you need to add a signature block to your letter for proper business format. A signature block appears below your last paragraph, has a closing, and your signature over your typed name. In a business letter, your title appears directly below your typed name.
To create this, at the end of your letter, drop down two lines with one or two Enters depending on your current Style. Type “Sincerely,” and press enter about four times to create room for a signature or emphasis for your name. Type your name as you sign it, for our example I will be “Joan Smith.”
Isn’t a typed name good enough?
A typed signature block is acceptable to recipients of most emailed letters. Sometimes you might want to use a script font to retype your name in the middle of the blank lines above the name typed in the normal font. Some script fonts are smaller, so use a bigger size for emphasis and legibility. For example here is a Freehand font in 24 point size:
What about a Real Signature?
Let’s say you need a “real” (actual a digital) signature. Take out a piece of plain white paper, regular 8 1/2 by 11 size white letter paper – the paper you use for a copy machine. Using a black Sharpie, create a large signature in the middle of the page. The large size will make the file more clear and legible when you resize it.
Use your scanner to create a black and white .jpg file. (Most office stores such as Staples or Office Depot have a print shop that can scan this for you for a small fee if you don’t have a scanner.) Save in a central, easy to find location. Save as Your Name Signature.jpg. Open the signature with photo editing software and crop it so that the empty edges of the white paper are left out, but your signature is still there. Resave the image.
To use your scanned signature, start with your cursor in the blank area of your signature block. On the Insert tab>Illustrations section>select Pictures. Browse for your scanned signature, then click Insert. Select the image of your signature, and grab a corner handle to adjust the size of your signature. When you click on your image, a small Layout Options box appears next to its top right corner. Click the Layout Options and select the bottom right choice, In Front of Text.
Now you may drag your signature image all over the page without affecting the text spacing. Drag and move your signature above your typed name.
If your signature has white space around it and blocks out the text, you need to make the white space transparent. In the Picture Tools tab>Color section>click on the Color drop-down arrow. From the menu, select Set Transparent Color. Your cursor will turn into an ink pen. Using the cursor, click on the white background of your signature. The white background will turn transparent and your text will show through it. Readjust size and location of your signature if necessary.
Now you can save your document as a pdf (File tab>Save as… File Type PDF). Your signature is there and no one can edit your document.
How do I sign a PDF?
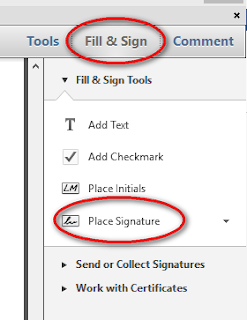
 If someone emails you a pdf, you can sign the document with the free Adobe Reader software. Open the document with Adobe Reader. Simply click on the “Fill & Sign” tab on the upper right, and then “Place Signature.” The first time you do this, you will need to browse for your signature image. After using it once, Acrobat Reader will remember where your signature is until you change it.
Once you save this pdf, it will automatically add “-signed copy” to the end of the name. If you have pdf editing software, such as Adobe Acrobat, editing will not work on the saved document. You will need to edit the original, before the signature was added – so don’t delete that one.


