Showing posts with label Word. Show all posts

Friday, June 15, 2018

MS Office / Word / Excel / PowerPoint: Customize Your Quick Access Toolbar

I have moved all my blogs to my new website:  https://helpfulofficetips.com/2018/06/15/ms-office-word-excel-powerpoint-customize-your-quick-access-toolbar/  From now on, all updates will be at the new site, and all links will take you directly to that site.  Please check it out!

When you first open any document in MS Word, MS Excel, or MS PowerPoint, you should notice there are little icons in the very top left, called the Quick Access Toolbar.  Microsoft puts some shortcuts here, like Save and Print, but they don’t really know what you need or use the most, do they?

Open MS Word.  Your Quick Access Toolbar may already look different than mine depending on when you installed MS Office.  Give yourself a quick tour by hovering your mouse over each item to see what it does. 


The standard Word default is four icons.

• “Save” is the small diskette
• “Undo” is the back-facing arrow
• “Redo” is the circular arrow
• “Customize” is the drop-down arrow with the small bar over it – I like to call this icon “more choices.”

Those are great choices… for a beginner.  Let’s click that Customize button and see what happens.  When we click Customize, “more choices” pop up below.  You can quickly click on these items to add choices to your Quick Access Toolbar.  Click on “Open” to add the File tab>Open command to yours. 


Look at your Quick Access Toolbar now.  You will see a file folder icon has been added to your Quick Access Toolbar.  

I like to keep my File tab icons together, so while that is a good shortcut, it doesn’t really let you determine the location of the icons.  

Let’s use “More Commands” instead of selecting them from this list.  Click “Customize>More Commands…” from the drop-down menu.  This brings up the Options window and goes right to “Quick Action Toolbar” menu.


Let’s take a little tour of the Customize the Quick Access Toolbar window.  Circled red, you will see that Word defaults to the “Popular Commands” choices.  These are the items commonly added to the menu.  You’ll see that “Redo,” “Save,” and “Undo” are already shown.

In the center circled green are the “Add>>” and “<<Remove” buttons.  We added “Open” earlier, as shown on the right.  If I click “<<Remove” it will disappear from my custom toolbar.

On the right circled blue are the up and down arrows.  Since I clicked on “Open,” I can move it higher up or down the list by clicking the up and down arrows.  This is confusing since the actual toolbar goes left to right, but you get the idea.  

I would like my “Open” icon to be before “Save.”  I will click the up arrow three times.  Try it at home.  This does not make any changes to the actual Quick Access Toolbar until you click OK.  Do it. 

Got it?  Let’s make some more changes.  Go back to Customize>More Commands. 

I never hung out with the “popular” crowd, so I don’t really want only the “Popular Commands.” Click the drop-down arrow next to “Popular Commands.”  A new menu appears with choices such as “All Commands” and then by tab, such as “File Tab” or “Home Tab.”  Choose “All Commands” so we can see everything!


A list in alphabetical order appears, sort of like a genie giving you multiple choices for your wish.  The first tab is called “<Separator>.  Let’s add that.  A <Separator> will turn into a small vertical line once we press OK.  Move the word <Separator> up two clicks so that it in between our file commands and our undo-redo commands.  Here’s what it will look like:  


Scroll down to the “Qs” and find “Quick Print.”  Add it to your Quick Access Toolbar.  “Quick Print” does just what it sounds like.  It takes your document with your current print settings and sends it to the last printer you used.  

Sometimes you want to see what it will look like first, though, right?  Let’s add a Preview button.  “Preview and Print” is a command that takes us to the Preview screen.  If we like what we see, we can print from that screen.  Choose “Preview and Print.”

Add another <Separator> above Quick Print so that your print commands are separated from Undo and Redo.  Does yours look like this now?


There are a few more “File tab” commands I like, so let’s find change “All Commands” to “File Tab.”  


From the File tab choices, select “Close File,” “New from Template,” and one of my favorites:  “Publish as PDF or XPS.”  (Don’t worry about “XPS” – no one uses that Microsoft format.)

Use the up and down arrows to put them in this order:

New from Template
Open
Save
Publish as PDF or XPS
Close File
<Separator>
Undo
Redo
<Separator>
Quick Print
Preview and Print

Once it is all set up, click OK, and your Quick Access Toolbar will look like this:


Now when you are working in Word, you have all your (or my) most used commands available with a quick click.  Give it a month or so, then come back to the Customize button and make any changes that you want.  This is your Quick Access Toolbar, so make it just the way you want it.


Friday, June 8, 2018

MS Word: Insert Date and Automatically Update

I have moved all my blogs to my new website:  https://helpfulofficetips.com/2018/06/08/ms-word-insert-date-and-automatically-update/  From now on, all updates will be at the new site, and all links will take you directly to that site.  Please check it out!

Your computer knows what day (or date) it is, right?  Instead of typing the date in Word, why not let the computer put the current date in for you?

Insert Date

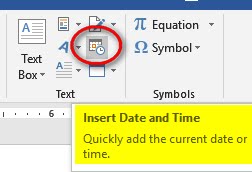
In MS Word, the Insert tab has lots of handy quick shortcuts to insert pictures, tables, links to the internet, and symbols.  It also can quickly insert today’s date in the format you choose.  Look to the left of the Insert tab in the Text section and you will see a small calendar/clock icon.  That’s what you use to insert the date.


Pick the spot on your Word document where you want the date, then click Insert tab>Text section>Date & Time. 

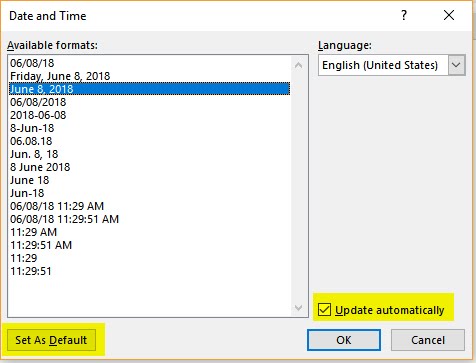
This brings up the Date & Time window with more than a dozen choices for date and time format. 


For most word processing uses, let’s spell out the month, then show the date and year, like this: 

January 1, 2018

Set As Default

Select that format from your menu by clicking it, but don’t click OK yet!  Notice the bottom of the Date & Time window.  Since this format is the one we will use the most often, click the “Set As Default” button.  This date format will now be MS Word’s favorite.  Next time you use the Insert tab>Text section>Date & Time button, this format will be highlighted in the Date and Time window.

Update Automatically (or Not)

Now look at the little checkmark next to “Update Automatically.”  When that box is checked, Word will insert a date “field” into your document.  This date field is more than a group of letters showing today’s date.  The field will update every time you open or print your document.  That means your paper will always have the most current date.

Do you want it to update automatically?  Usually, you do so you can tell when you printed a document or keep the date of a letter current.  If this is a legal document, you may wish to keep the original date only and never update it.  That’s up to you, but don’t always use “update automatically” automatically.  Think about it first.


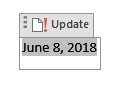
For today’s exercise, be sure “Update Automatically” is checked, then click OK.  Word places today’s date into your document as a date field.  Click on the date, and the entire date field will be highlighted with the word “Update” above it.  You can’t change the date without deleting the date field and starting over.  click anywhere off the date, and it looks like normal text, right?

Save and Check Back Tomorrow

Save the document and open it tomorrow, and tomorrow’s date will show up.  Open it next year, and the current date will always show up.  (If you save your document as a PDF, the date on your PDF will be frozen on that date forever.)

Friday, September 8, 2017

MS Word: Introduction Lessons

I have moved all my blogs to my new website:  https://helpfulofficetips.com/2017/09/08/ms-word-introduction-lessons/   From now on, all updates will be at the new site, and all links will take you directly to that site.  Please check it out!

I teach an Introduction to MS Windows class for a community education program.  Noobie.com asked me to type up those lessons for their blog site.  You may find some of them helpful, so here are the links:


Thursday, September 10, 2015

Inserting and Formatting a Table with a Formula in MS Word

I have moved all my blogs to my new website:  https://helpfulofficetips.com/2015/09/10/inserting-and-formatting-a-table-with-a-formula-in-ms-word/  From now on, all updates will be at the new site, and all links will take you directly to that site.  Please check it out!

I was recently teaching a MS Word workshop and ran out of time to teach about inserting a table, so here is that lesson.  I was going to use it as an introduction to Excel, with a subtitle: why-tables-are-easier-in-Excel-than-Word.  Sometimes, though, you just need a tiny table in the middle of your document without inserting a spreadsheet, so Microsoft has included some basic table functions in Word.

First, let’s define a table using spreadsheet terms.  This will help when we transition to Excel. A table is a grid of cells laid out in rows and columns.  Rows go across horizontally and columns go up and down vertically. Memorize that while I wait.

Insert and Create your Table


Ready, now place your cursor where you want the table.  You’ll be able to move it later, so just give it a good guess for now.

On the Insert tab>Tables section>select the drop-down arrow below Tables. The Insert Table window menu will appear.  Drag your cursor through the squares to select your number of cells in rows and columns.  For this exercise, use two columns and five rows.  Word automatically puts in you “Drag” mode, so you don’t have to hold down the mouse button.  Drag through two horizontal squares (columns) and five vertical squares (rows) as shown.

The arrow in the illustration points to the text above the grid.  It will change from “Insert Table” to a description of your table, 2x5 Table, when you have our chosen layout selected. When you click on the grid square two columns and five rows down, Word inserts a two column, five row table in your document.

All columns are spaced evenly between the current margins and the rows are spaced evenly based on your current line spacing.


Add Text and/or Numbers


Let’s add data to your Table.  You may click, tab, or cursor to go from cell to cell.  (A not-so-subtle reminder that numbers have to be checked for typos.  Spell-check doesn’t help here.)

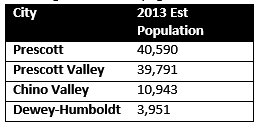
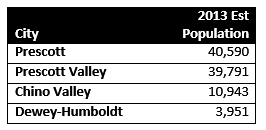
I recently moved to a new town, so I’m going to use US Census Bureau population estimates from the neighboring communities.  Just type the information, starting with a descriptor in the top cells; we’ll format it later.

City
2013 Est Population
Prescott
40,590
Prescott Valley
39,791
Chino Valley
10,943
Dewey-Humboldt
3,951


Formatting your Table with Table Styles


Now let’s make it easier on the eyes with some formatting.  When making changes to the format of your entire table, always select the table first.  When selected, a small “Move” arrow group will appear on the top left corner.   Select your table, then on the Home tab>Styles section> select No Spacing to get rid of any strange formatting, like double-spacing.  Do this as a matter of habit.

Hopefully, you noticed that when you select your table, the Table Tools tab appears with two tabs:  Design and Layout.  Let’s select a pre-designed style.  On the Tables/Design tab>Tables Styles section>click the more choices drop-down arrow.   Let’s pick a simple and bold style today.  Scroll down to the black header, horizontal borders, with no vertical lines inside.


Resize and Move your Table


To resize our table, select and drag the bottom right corner handle to the left until “Dewey-Humboldt” goes to two lines.  Stretch it back until it is only one line.

Now grab the “Move” arrow on the top left and drag your table to the right side of the page.  Your words will automatically wrap around it.

Align your Text or Numbers within your Table


In a table, you can set each cell, each row, or each column so that is aligned up, down or center, and right, left, or center.  Click on the “City” cell.   In the Table Tools>Layout tab>Alignment section>there are nine alignment choices.  For “City,” select Align Bottom Left icon.

Numbers and their headings should always be right-aligned.  So we want the entire right-hand column aligned to the right, right?  Hover your mouse over the right-hand column until a small black down arrow ↓ appears.  That is the Select Column arrow.  Click your mouse when the arrow appears. (You may also drag through the right-hand column from top to bottom.)

Your column will be selected.  In the Table Tools>Layout tab>Alignment section>select Align Top Right icon.  Your column heading and the numbers will move to the right of the table.

Add a Totals Row with a Formula


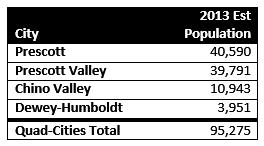
These four towns are called the Quad-Cities, and inquiring minds want to know the total population, but we don’t want to get out a calculator.  Word has a few built-in formulas for our table.

First we need to add a row for our total.  Click anywhere on the bottom row of our table.  Right-click and select Insert>Insert Rows Below. A blank row of similar size and shape will be added below.(Notice you can also delete and shift cells or rows from this right-click menu.)

In the City column of our new bottom row, type “Quad-Cities Total.”  Tab over (or click) to the bottom row of the Population column.  In the Table Tools>Layout tab>Data section, select Formula
and the  Formula window will appear.  The default formula is “equal” to the “sum” of the column “above” so the formula is filled in for you as “=SUM(ABOVE).”  Click OK and the total will appear.

We want to emphasize the total line, so let’s change a Border in our Table.  With the table selected, go to Table Tools>Design tab>Border section.  The default border is 1/2 point.  Change the border to 3 point for an emphasis line.  Now your mouse has changed to an Ink Pen icon.  With this ink pen mouse, draw through the line above your totals row.

Review, Proof, and Update your Table


We are almost finished.  Always review your table for readability.  Does it give the information we want at a glance?  Is there any confusion?  Remember the priority is to make your information stand out.  Colors and fonts can be distracting.  Use a critic’s eye and double-check your numbers for typos.

Now, go learn Excel, it’s much more fun and faster.  Why?  If you make a correction to your numbers, your total will not automatically update in MS Word.  You need to click on the total number, right-click and select Update Field to adjust the total.  (Excel does this automatically.)

Monday, August 31, 2015

Adding my Signature to a Letter for Emailing

I have moved all my blogs to my new website:  https://helpfulofficetips.com/2015/08/31/adding-my-signature-to-a-letter-for-emailing/  From now on, all updates will be at the new site, and all links will take you directly to that site.  Please check it out!

What’s a Signature Block?

First, you need to add a signature block to your letter for proper business format.  A signature block appears below your last paragraph, has a closing, and your signature over your typed name.  In a business letter, your title appears directly below your typed name.

To create this, at the end of your letter, drop down two lines with one or two Enters depending on your current Style.  Type “Sincerely,” and press enter about four times to create room for a signature or emphasis for your name.  Type your name as you sign it, for our example I will be “Joan Smith.”

Isn’t a typed name good enough?

A typed signature block is acceptable to recipients of most emailed letters.  Sometimes you might want to use a script font to retype your name in the middle of the blank lines above the name typed in the normal font.  Some script fonts are smaller, so use a bigger size for emphasis and legibility.  For example here is a Freehand font in 24 point size:


What about a Real Signature?

Let’s say you need a “real” (actual a digital) signature. Take out a piece of plain white paper, regular 8 1/2 by 11 size white letter paper – the paper you use for a copy machine.  Using a black Sharpie, create a large signature in the middle of the page.  The large size will make the file more clear and legible when you resize it.


Use your scanner to create a black and white .jpg file.  (Most office stores such as Staples or Office Depot have a print shop that can scan this for you for a small fee if you don’t have a scanner.)  Save in a central, easy to find location.  Save as Your Name Signature.jpg.  Open the signature with photo editing software and crop it so that the empty edges of the white paper are left out, but your signature is still there.  Resave the image.
To use your scanned signature, start with your cursor in the blank area of your signature block.  On the Insert tab>Illustrations section>select Pictures.  Browse for your scanned signature, then click Insert.  Select the image of your signature, and grab a corner handle to adjust the size of your signature.  When you click on your image, a small Layout Options box appears next to its top right corner.  Click the Layout Options and select the bottom right choice, In Front of Text.

Now you may drag your signature image all over the page without affecting the text spacing.  Drag and move your signature above your typed name.

If your signature has white space around it and blocks out the text, you need to make the white space transparent.  In the Picture Tools tab>Color section>click on the Color drop-down arrow.   From the menu, select Set Transparent Color.  Your cursor will turn into an ink pen.  Using the cursor, click on the white background of your signature.  The white background will turn transparent and your text will show through it.  Readjust size and location of your signature if necessary.


Now you can save your document as a pdf (File tab>Save as… File Type PDF).  Your signature is there and no one can edit your document.

How do I sign a PDF?

If someone emails you a pdf, you can sign the document with the free Adobe Reader software.  Open the document with Adobe Reader.  Simply click on the “Fill & Sign” tab on the upper right, and then “Place Signature.”  The first time you do this, you will need to browse for your signature image.  After using it once, Acrobat Reader will remember where your signature is until you change it.


Once you save this pdf, it will automatically add “-signed copy” to the end of the name.  If you have pdf editing software, such as Adobe Acrobat, editing will not work on the saved document.  You will need to edit the original, before the signature was added – so don’t delete that one.


Monday, July 20, 2015

Using Shortcut Keys to Select A Range

I have moved all my blogs to my new website:  https://helpfulofficetips.com/2015/07/20/using-shortcut-keys-to-select-a-range/ From now on, all updates will be at the new site, and all links will take you directly to that site.  Please check it out!

Microsoft has developed several standard ways to select bits of text, objects, or files in most of their products.  The methods below are specific to text but apply to other objects as well.  After getting used to them in MS Office, try using them out to rearrange your desktop, or move multiple files from one folder to another.

  1. Drag:  Drag by clicking on the first part, then holding the mouse button down as you drag to the end of your selection.
  2. Double-click:  Double-click a word to select the word.  Sometimes a double-clicking an item, such as tab on the ruler or a menu icon, will open a new window with more formatting choices.  In Windows Explorer, double-clicking opens a folder or file.  
  3. Triple-click:  Triple-clicking a word will select the entire line of text or paragraph, whatever words fall between pressing "Enter" and pressing it again.
  4. Shift Click:  Hold down your shift button.  Start at the top of your range and click. Click again at the bottom of your range.  This also works bottom to top - it is simply telling the computer select everything between my two clicks.
  5. Shift Click with Cursor:  This is variation, if you don't want to use your mouse to drag.  It's especially handy in MS Excel.  Hold down Shift.  Click at the top.  Use the cursors or arrows on the right of your keyboard to move through your document.  Release shift when you have selected your range.
  6. Ctrl Click:  Select multiple items one at a time, with Ctrl click.  If you get one item by mistake, Ctrl click again to deselect.
  7. Select All:  Select everything in your document in most MS Office products from the Home tab>Select section>click the drop-down arrow next to Select.  On the Select menu, click Select All.  You may also Ctrl A for “All.” 


Tuesday, November 26, 2013

Use Excel and Word's Mail Merge to Print Mailing Labels

I have moved all my blogs to my new website: https://helpfulofficetips.wordpress.com/2013/11/27/use-excel-and-words-mail-merge-to-print-mailing-labels/ From now on, all updates will be at the new site, and all links will take you directly to that site.  Please check it out!

First, create a basic mailing list in Excel of your friends and family.  You must include the headers for each column.  Here is an example:

Last First Address City ST Zip
Bennet Elizabeth 123 Pier Street Santa Monica CA 90401
Bennet Jane 2345 Colorado Avenue Santa Monica CA 90401
Bingley Charles 900 Wilshire Boulevard Westwood CA 90024
Darcy Fitzwilliam 601 N. Rodeo Drive Beverly Hills CA 90210


Save it and name it Mailing Labels.

Now open a new Word document  In the Mailings tab, click Start Mail Merge and select Labels. Have your box of labels handy and find the code.  Avery 5160 is the norm - that's the one with 30 labels per sheet.

To see your labels outlines, go to the Table Tools>Design tab that appeared in Word.  Click the Table Tools tab which appeared and select View Gridlines.

   
Now enter your "Merge Fields."  Put your cursor in the label.  Still on the Mailings tab, in the Write & Insert Fields section, select Insert Merge Field.  Click for the pull-down menu.  Select the merge fields and add the appropriate spacing.  (You can also add the spaces in later.)

<<First>> space <Last>>
<<Address>>
<<City>> comma space <<ST>> space space <<Zip>>

Your labels will look like this


Click Mailings tab>Write & Insert Fields section>Update Labels.


Now your labels will look like this:


To see your friends’ names, click Mailings tab>Preview Results section>Preview Results

You may adjust font, size, and spacing, use the first label only, then click Update Labels and your formatting will be copied to all labels.


Print one label on regular paper first, so you don’t waste the labels.  Most printers will have a little graphic that explains which side up or down, top or bottom.

Monday, November 11, 2013

MS Word: Resetting the Page Number in the Middle of your Document

I have moved all my blogs to my new website: https://helpfulofficetips.wordpress.com/2013/11/11/ms-word-and-resetting-the-page-number-in-the-middle-of-your-document/ From now on, all updates will be at the new site, and all links will take you directly to that site.  Please check it out!

A co-worker was struggling with starting the first page of Chapter 1 of a document being page 1.  The title page and table of contents were not supposed to be numbered.  What to do?  Word has the most annoying outline and page numbering systems ever invented IMHO.

Use a normal footer on your first page to start, even if that page is your title page or lists your contents.  It will default to page 1, of course.

Now, put your cursor at the end of your last non-numbered page, let's say the table of contents.  DO NOT put it at the beginning of Chapter 1 or you will end up with an extra (and blank) page 1 after these steps. 

Click on the Page Layout tab>Page Setup section>click on Breaks’ drop-down arrow.


Then click Next Page.


Now, you can select the page number on the next page and change its format.  Drag through the page number and right click.  Select “Format Page Numbers.”  In the Page Number Format window, select the “Start at:”  and “1” and OK.


Now go back to your page number on the title page and/or Table of Contents and delete or change the formatting to “i, ii, iii” for those sections.  (Everyone will be very impressed if you use little Roman numerals - just don't tell anyone you can't find the Roman numerals on your keyboard.)

Sunday, March 25, 2012

Excel and Word 2010 – Keeping your Number and Date Formats When Using a Spreadsheet for an Form Letter

Before we discuss creating a form letter for email or snail mail, there is a HUGE fix you must complete in MS Word.  If you do NOT do this fix, no matter how beautifully you format your numbers and dates in your Excel spreadsheet, Word will NOT pick up that formatting.  Word will simply guess randomly and DIFFERENTLY for all the numbers and dates it is taking from your spreadsheet.

I wouldn’t be YELLING, if this wasn’t such an important issue.  It took me four or five hours of Googling to find this simple fix. Last month, I got a new computer at work, and this fix had completely slipped my mind.  That meant none of my existing mail merge documents would work on the new computer until I remembered.

In MS Word, go to the File tab>Options>Advanced.


In the Advanced window, scroll all the way down to the last section:  General.  Click the box “Confirm file format conversion on open” checkbox.  Click “OK.” 


Now, on this computer, Word will confirm that you want Excel formatting when you open a spreadsheet for a mail merge.  There are still a few complications in Word, but we’ll talk about those steps later.

You will need to do this on all of your computers:  your desktop, your laptop, your home computer, your work computer.  The information is NOT saved with your mail merge document in Word.  Maybe, just maybe, someday Microsoft will make this the default and not the option – I can dream, can’t I?