I have moved all my blogs over to my new website, HelpfulOfficeTips.com.
I hope you will join me. I am updating and linking each post, one by one. I hope to see you there!
Friday, May 31, 2019

Saturday, April 13, 2019
Automatically Playing an Embedded YouTube Video in PowerPoint 2019
I have moved all my blogs to my new website: https://helpfulofficetips.com/2019/04/13/automatically-playing-an-embedded-youtube-video-in-powerpoint-2019/ From now on, all updates will be at the new site, and all links will take you directly to that site. Please check it out!
PowerPoint 2019 can now embed and automatically play a YouTube video during your slide show! (Over the last few years Microsoft and Google have changed this process many, many times. We will see how long this update and cooperation lasts.)
These instructions work as of April 13, 2019. Tomorrow, you may be on your own.
For PowerPoint 2016 and earlier versions, click here: https://helpfulofficetips.com/2016/08/02/automatically-playing-an-embedded-youtube-video-in-powerpoint-2016/
YouTube
Using the internet, find your YouTube video. (Watch the entire video, start to finish, to be sure it is appropriate for your presentation.) Pause the video (because it’s annoying when it’s running and you’re trying to think). If you want to practice, here is the URL for a really cute Oreo commercial from India that I show to all my classes: https://youtu.be/Oe6lBGO6OSk
Click on the word Share below the video. The Share window will appear. In the bottom “Share a link” portion, you will see the URL with the word “COPY.”

Click “COPY.” Copy will place the video’s URL in the computer’s clipboard memory until you need it or copy something else.
PowerPoint 2019
Now return to PowerPoint and the slide where you want to play a YouTube video. Go to the Insert tab. On the far right is the word “Video” with a drop-down arrow. Click Insert tab>Media section>Video>Online Video.

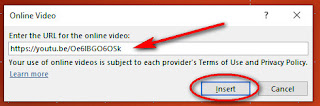
The Online Video window will appear. Click inside the URL box and right-click>Paste or press Ctrl-V to paste the YouTube video URL. Click Insert to insert the video-link into your slide.
Your video will appear on the slide. Drag the corners to fit the slide, usually to the edges. (To drag the corners, click on the top left corner and hold the mouse button down. Move or “drag” the mouse to the top edge of the slide. Do the same for the bottom right corner.)
Notice that when you have selected the video, new special tabs appear in the menu ribbon. There are two Video Tools tabs: Format and Playback. When you inserted the video, PowerPoint selected the Video Tools>Format tab, in case you want to recolor, add a frame or crop the video. Instead, click the Video Tools>Playback tab. Remember, these menu tabs only appear if you have selected your video.

Play "Automatically" or "In Click Sequence"
The important option in the Video Tools>Playback tab is in the Video Options>Start. Click the drop-down menu next to Start.
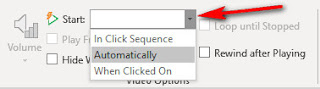
Three options will appear.
For me, I would probably click either In Click Sequence if I want to introduce the video or Automatically if I used a previous slide to set the stage.
Timings and order may be changed via the Animations Pane, but that is another lesson!
PowerPoint 2019 can now embed and automatically play a YouTube video during your slide show! (Over the last few years Microsoft and Google have changed this process many, many times. We will see how long this update and cooperation lasts.)
These instructions work as of April 13, 2019. Tomorrow, you may be on your own.
For PowerPoint 2016 and earlier versions, click here: https://helpfulofficetips.com/2016/08/02/automatically-playing-an-embedded-youtube-video-in-powerpoint-2016/
YouTube
Using the internet, find your YouTube video. (Watch the entire video, start to finish, to be sure it is appropriate for your presentation.) Pause the video (because it’s annoying when it’s running and you’re trying to think). If you want to practice, here is the URL for a really cute Oreo commercial from India that I show to all my classes: https://youtu.be/Oe6lBGO6OSk
Click on the word Share below the video. The Share window will appear. In the bottom “Share a link” portion, you will see the URL with the word “COPY.”

Click “COPY.” Copy will place the video’s URL in the computer’s clipboard memory until you need it or copy something else.
PowerPoint 2019
Now return to PowerPoint and the slide where you want to play a YouTube video. Go to the Insert tab. On the far right is the word “Video” with a drop-down arrow. Click Insert tab>Media section>Video>Online Video.

The Online Video window will appear. Click inside the URL box and right-click>Paste or press Ctrl-V to paste the YouTube video URL. Click Insert to insert the video-link into your slide.

Your video will appear on the slide. Drag the corners to fit the slide, usually to the edges. (To drag the corners, click on the top left corner and hold the mouse button down. Move or “drag” the mouse to the top edge of the slide. Do the same for the bottom right corner.)
Notice that when you have selected the video, new special tabs appear in the menu ribbon. There are two Video Tools tabs: Format and Playback. When you inserted the video, PowerPoint selected the Video Tools>Format tab, in case you want to recolor, add a frame or crop the video. Instead, click the Video Tools>Playback tab. Remember, these menu tabs only appear if you have selected your video.

Play "Automatically" or "In Click Sequence"
The important option in the Video Tools>Playback tab is in the Video Options>Start. Click the drop-down menu next to Start.

Three options will appear.
- In Click Sequence: The slide will pop-up showing a still frame with the YouTube play button in the middle. To start the video, click the mouse anywhere (or press the space bar or forward on your pointer), and the video will begin.
- Automatically: As soon as you begin this slide, the video will begin. This is great for a self-running show, but you will not get a chance to introduce the video.
- When Clicked on: You will need to move your cursor to the video and click for the video to begin. You do not need to click exactly on the YouTube play button as you did in the past.
For me, I would probably click either In Click Sequence if I want to introduce the video or Automatically if I used a previous slide to set the stage.
Timings and order may be changed via the Animations Pane, but that is another lesson!
Friday, June 15, 2018
MS Office / Word / Excel / PowerPoint: Customize Your Quick Access Toolbar
I
have moved all my blogs to my new website: https://helpfulofficetips.com/2018/06/15/ms-office-word-excel-powerpoint-customize-your-quick-access-toolbar/ From now on, all
updates will be at the new site, and all links will take you directly to that
site. Please check it out!
When you first open any document in MS Word, MS Excel, or MS PowerPoint, you should notice there are little icons in the very top left, called the Quick Access Toolbar. Microsoft puts some shortcuts here, like Save and Print, but they don’t really know what you need or use the most, do they?
Open MS Word. Your Quick Access Toolbar may already look different than mine depending on when you installed MS Office. Give yourself a quick tour by hovering your mouse over each item to see what it does.

The standard Word default is four icons.
• “Save” is the small diskette
• “Undo” is the back-facing arrow
• “Redo” is the circular arrow
• “Customize” is the drop-down arrow with the small bar over it – I like to call this icon “more choices.”
Those are great choices… for a beginner. Let’s click that Customize button and see what happens. When we click Customize, “more choices” pop up below. You can quickly click on these items to add choices to your Quick Access Toolbar. Click on “Open” to add the File tab>Open command to yours.

Look at your Quick Access Toolbar now. You will see a file folder icon has been added to your Quick Access Toolbar.
I like to keep my File tab icons together, so while that is a good shortcut, it doesn’t really let you determine the location of the icons.
Let’s use “More Commands” instead of selecting them from this list. Click “Customize>More Commands…” from the drop-down menu. This brings up the Options window and goes right to “Quick Action Toolbar” menu.

Let’s take a little tour of the Customize the Quick Access Toolbar window. Circled red, you will see that Word defaults to the “Popular Commands” choices. These are the items commonly added to the menu. You’ll see that “Redo,” “Save,” and “Undo” are already shown.
In the center circled green are the “Add>>” and “<<Remove” buttons. We added “Open” earlier, as shown on the right. If I click “<<Remove” it will disappear from my custom toolbar.
On the right circled blue are the up and down arrows. Since I clicked on “Open,” I can move it higher up or down the list by clicking the up and down arrows. This is confusing since the actual toolbar goes left to right, but you get the idea.
 I would like my “Open” icon to be before “Save.” I will click the up arrow three times. Try it at home. This does not make any changes to the actual Quick Access Toolbar until you click OK. Do it.
Got it? Let’s make some more changes. Go back to Customize>More Commands.

I never hung out with the “popular” crowd, so I don’t really want only the “Popular Commands.” Click the drop-down arrow next to “Popular Commands.” A new menu appears with choices such as “All Commands” and then by tab, such as “File Tab” or “Home Tab.” Choose “All Commands” so we can see everything!

A list in alphabetical order appears, sort of like a genie giving you multiple choices for your wish. The first tab is called “<Separator>. Let’s add that. A <Separator> will turn into a small vertical line once we press OK. Move the word <Separator> up two clicks so that it in between our file commands and our undo-redo commands. Here’s what it will look like:

Scroll down to the “Qs” and find “Quick Print.” Add it to your Quick Access Toolbar. “Quick Print” does just what it sounds like. It takes your document with your current print settings and sends it to the last printer you used.
Sometimes you want to see what it will look like first, though, right? Let’s add a Preview button. “Preview and Print” is a command that takes us to the Preview screen. If we like what we see, we can print from that screen. Choose “Preview and Print.”
Add another <Separator> above Quick Print so that your print commands are separated from Undo and Redo. Does yours look like this now?

There are a few more “File tab” commands I like, so let’s find change “All Commands” to “File Tab.”

From the File tab choices, select “Close File,” “New from Template,” and one of my favorites: “Publish as PDF or XPS.” (Don’t worry about “XPS” – no one uses that Microsoft format.)
 Use the up and down arrows to put them in this order:
New from Template
Open
Save
Publish as PDF or XPS
Close File
<Separator>
Undo
Redo
<Separator>
Quick Print
Preview and Print
Once it is all set up, click OK, and your Quick Access Toolbar will look like this:

Now when you are working in Word, you have all your (or my) most used commands available with a quick click. Give it a month or so, then come back to the Customize button and make any changes that you want. This is your Quick Access Toolbar, so make it just the way you want it.
Friday, June 8, 2018
MS Word: Insert Date and Automatically Update
I
have moved all my blogs to my new website: https://helpfulofficetips.com/2018/06/08/ms-word-insert-date-and-automatically-update/ From now on, all updates will be at the new site, and all
links will take you directly to that site. Please check it out!
Your computer knows what day (or date) it is, right? Instead of typing the date in Word, why not let the computer put the current date in for you?
Insert Date
In MS Word, the Insert tab has lots of handy quick shortcuts to insert pictures, tables, links to the internet, and symbols. It also can quickly insert today’s date in the format you choose. Look to the left of the Insert tab in the Text section and you will see a small calendar/clock icon. That’s what you use to insert the date.

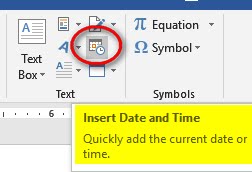
Pick the spot on your Word document where you want the date, then click Insert tab>Text section>Date & Time.
This brings up the Date & Time window with more than a dozen choices for date and time format.
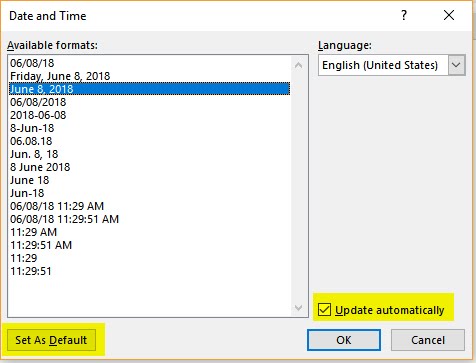
For most word processing uses, let’s spell out the month, then show the date and year, like this:
January 1, 2018
Set As Default
Select that format from your menu by clicking it, but don’t click OK yet! Notice the bottom of the Date & Time window. Since this format is the one we will use the most often, click the “Set As Default” button. This date format will now be MS Word’s favorite. Next time you use the Insert tab>Text section>Date & Time button, this format will be highlighted in the Date and Time window.
Update Automatically (or Not)
Now look at the little checkmark next to “Update Automatically.” When that box is checked, Word will insert a date “field” into your document. This date field is more than a group of letters showing today’s date. The field will update every time you open or print your document. That means your paper will always have the most current date.
Do you want it to update automatically? Usually, you do so you can tell when you printed a document or keep the date of a letter current. If this is a legal document, you may wish to keep the original date only and never update it. That’s up to you, but don’t always use “update automatically” automatically. Think about it first.
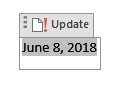 For today’s exercise, be sure “Update Automatically” is checked, then click OK. Word places today’s date into your document as a date field. Click on the date, and the entire date field will be highlighted with the word “Update” above it. You can’t change the date without deleting the date field and starting over. click anywhere off the date, and it looks like normal text, right?
Save and Check Back Tomorrow
Save the document and open it tomorrow, and tomorrow’s date will show up. Open it next year, and the current date will always show up. (If you save your document as a PDF, the date on your PDF will be frozen on that date forever.)
Save the document and open it tomorrow, and tomorrow’s date will show up. Open it next year, and the current date will always show up. (If you save your document as a PDF, the date on your PDF will be frozen on that date forever.)
Thursday, October 26, 2017
Excel Basics
I
have moved all my blogs to my new website: https://helpfulofficetips.com/2017/10/27/excel-basics/ From now on, all updates will be at the new site, and all
links will take you directly to that site. Please check it out!
I am a guest blogger on Noobie.com. They asked me to create some new-to-Excel posts for beginners. Just click the links below to go right to those lessons:
Excel Spreadsheet Basics Everyone Should Know: a tour of Excel, discussion of the cursors, and how to move around
Formatting Cells in Excel For a Better Understanding of Information: basic formatting
Excel Dates | How to Format Dates in Excel: use Excel's formatting shortcuts and more advanced formatting features to make your dates just the way you want them.
Excel Formulas and Dollar Format: create a simple spreadsheet multiplying quantity and price to get the cost, plus adding up the sales
Excel Tables | How To Format Excel Tables with Total Sort and Filter: format information as a table so you can sort and filter
How To Create Charts and Graphs in Excel: make your numbers visual with a chart or graph
Friday, September 8, 2017
MS Word: Introduction Lessons
I
have moved all my blogs to my new website: https://helpfulofficetips.com/2017/09/08/ms-word-introduction-lessons/
From now on, all updates will be at the new site, and all
links will take you directly to that site. Please check it out!
I teach an Introduction to MS Windows class for a community education program. Noobie.com asked me to type up those lessons for their blog site. You may find some of them helpful, so here are the links:
Thursday, July 6, 2017
Windows: Some Beginner Lessons
I have moved all my blogs to my new website: https://helpfulofficetips.com/2017/07/06/windows-some-beginner-lessons/
From now on, all updates will be at the
new site, and all links will take you directly to that site. Please check
it out!
I am a guest-writer on a website that teaches tech, and I designed a few lessons for brand new Windows computer users. For novices, I'd recommend reviewing them in order for the best learning experience. If you have some basic knowledge of Windows, pick and choose.
- Windows 10 Basics: Boot Up, Restart, Sleep, and Shut Down
- Windows Taskbar
- Learning to Save a Document in Notepad
- Windows File Explorer: Search, Create Folders, Move and Rename Files
- Windows PC Memory: This PC, Adjust Windows, File Extensions
- Windows: USB Drives, Phone, Camera and Memory Cards
Saturday, January 7, 2017
Voice Mail for the Small Business Owner
I have moved all my blogs to my new website: https://helpfulofficetips.com/2017/01/07/voice-mail-for-the-small-business-owner/
From now on, all updates will be at the
new site, and all links will take you directly to that site. Please check
it out!
Do you have one phone for business and one phone for personal calls? If not, your voice mail for your phone should be professional.
What are the parts of an excellent voice mail message?
Call a few similar businesses after hours and listen to their messages. What do you like and what don’t you like? What makes you feel like your call really is important?
Does it answer the basic questions:
- Who?
- What?
- When?
- Where?
- How?
Before recording any message, practice in front of mirror and smile the entire time! This practice will also help in your daily interactions with clients.
Who? State your name and/or the name of your business.
What? Think of your missions statement or elevator pitch. State what you do in one sentence.
When? State your hours. If you do not have regular hours, such as “Monday through Friday, 8 to 5,” think of the simplest way to state your hours so someone can understand. Practice this with a friend or ask for help.
Where? State your address and cross-streets if applicable… or say “We come to you!”
How? What is the best way for the customer to reach you for an appointment or questions? Email, website, leave a message. You may wish to state how quickly they may expect to hear from you: 24 hours, the next business day, etc.
Many cell phone companies allow a caller to press a key, like “*” to skip the message. Please check with your provider, and ask if this is possible. If so, add the instructions to the end of your message, such as “To skip this message in the future, please press ‘star’.”
Clear and concise is the key!
Tuesday, August 2, 2016
Automatically Playing an Embedded YouTube Video in PowerPoint 2016
I have moved all my blogs to my new website: https://helpfulofficetips.com/2016/08/02/automatically-playing-an-embedded-youtube-video-in-powerpoint-2016/
From now on, all updates will be at the
new site, and all links will take you directly to that site. Please check
it out!
If you are using PowerPoint 2019 or MS Office 365 after April 2019, click here for the updated procedure: https://helpfulofficetips.com/2019/04/13/automatically-playing-an-embedded-youtube-video-in-powerpoint-2019/
(Updated for PowerPoint 2016 on September 3, 2018 for after YouTube changed its Embed Codes slightly.)
I'm getting ready to teach another PowerPoint class, so I got out my previous class notes. I teach this class about once a year, and with every new update from Microsoft or Google's YouTube, I know my instructions will be out of date. Sure enough...
First, I was pleasantly surprised to see that Microsoft has added an “Online Video” option for adding video. It even has an option to search for a video on YouTube. Great, right?

It’s only great if you want that big red YouTube play icon right in the middle of your PowerPoint show. You also have to click on the big red YouTube play icon to play your video. This is not always the easiest thing to do if you are in a presentation hall and using a laser pointer.
My class is beginning PowerPoint, so of course, I will show them how to do it with the big red YouTube play icon, but I was sure I could still use the old instructions. Right?
Wrong again. The old version used the “Old Embed Code” which is no longer available from YouTube. I googled and googled for a workaround and found several, but none that were recognized by PowerPoint.
If finally decided to try my limited HTML skills and combine the old with the new, right? IT WORKED!

These instructions have been updated and work as of August 2, 2016. Tomorrow, you’re on your own.
- Using the internet, find your YouTube video
- Pause the video (because it’s annoying when it’s running and you’re trying to think).
- Click on the word Share below the video.
- Click on the word Embed below Share.
- Scroll down below "Embed Options" and unclick those boxes (at least, that's what I do), especially “Show suggested videos when the video finishes”
- Scroll back up so you can see the HTML code.
- Here is the tricky part. After the video name which is a bunch of gobbledygook like “Oe6lBGO6OSk” you’ll see a question mark (?). Be sure to uncheck those Embed Options or the question mark may not show up.
- Place your cursor to the right of the question mark and type this:;autoplay=1;(those are semicolons, not colons)
- Click the "Copy" button in the Embed Video window, and the HTML code will be copied to your Clipboard.
- Go back to PowerPoint, click on the Insert tab>Online Video.
- Instead of using the built-in YouTube search, click on the Video Embed Code box, and paste the embed code by Right-click>Paste (or Ctrl-V).

- Now hit enter, and a black video box should show up on your slide.
- Adjust your frame, and as always, preview the current slide in Slide Show tab and to see if it worked.

Thursday, September 10, 2015
Inserting and Formatting a Table with a Formula in MS Word
I have moved all my blogs to my new website: https://helpfulofficetips.com/2015/09/10/inserting-and-formatting-a-table-with-a-formula-in-ms-word/
From now on, all updates will be at the
new site, and all links will take you directly to that site. Please check
it out!
I was recently teaching a MS Word workshop and ran out of time to teach about inserting a table, so here is that lesson. I was going to use it as an introduction to Excel, with a subtitle: why-tables-are-easier-in-Excel-than-Word. Sometimes, though, you just need a tiny table in the middle of your document without inserting a spreadsheet, so Microsoft has included some basic table functions in Word.
First, let’s define a table using spreadsheet terms. This will help when we transition to Excel. A table is a grid of cells laid out in rows and columns. Rows go across horizontally and columns go up and down vertically. Memorize that while I wait.
Insert and Create your Table
Ready, now place your cursor where you want the table. You’ll be able to move it later, so just give it a good guess for now.

The arrow in the illustration points to the text above the grid. It will change from “Insert Table” to a description of your table, 2x5 Table, when you have our chosen layout selected. When you click on the grid square two columns and five rows down, Word inserts a two column, five row table in your document.
All columns are spaced evenly between the current margins and the rows are spaced evenly based on your current line spacing.
Add Text and/or Numbers
Let’s add data to your Table. You may click, tab, or cursor to go from cell to cell. (A not-so-subtle reminder that numbers have to be checked for typos. Spell-check doesn’t help here.)
I recently moved to a new town, so I’m going to use US Census Bureau population estimates from the neighboring communities. Just type the information, starting with a descriptor in the top cells; we’ll format it later.
City
|
2013
Est Population
|
Prescott
|
40,590
|
Prescott
Valley
|
39,791
|
Chino
Valley
|
10,943
|
Dewey-Humboldt
|
3,951
|

Formatting your Table with Table Styles
Now let’s make it easier on the eyes with some formatting. When making changes to the format of your entire table, always select the table first. When selected, a small “Move” arrow group will appear on the top left corner. Select your table, then on the Home tab>Styles section> select No Spacing to get rid of any strange formatting, like double-spacing. Do this as a matter of habit.
Hopefully, you noticed that when you select your table, the Table Tools tab appears with two tabs: Design and Layout. Let’s select a pre-designed style. On the Tables/Design tab>Tables Styles section>click the more choices drop-down arrow. Let’s pick a simple and bold style today. Scroll down to the black header, horizontal borders, with no vertical lines inside.


Resize and Move your Table
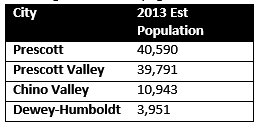
Now grab the “Move” arrow on the top left and drag your table to the right side of the page. Your words will automatically wrap around it.
Align your Text or Numbers within your Table
In a table, you can set each cell, each row, or each column so that is aligned up, down or center, and right, left, or center. Click on the “City” cell. In the Table Tools>Layout tab>Alignment section>there are nine alignment choices. For “City,” select Align Bottom Left icon.

Numbers and their headings should always be right-aligned. So we want the entire right-hand column aligned to the right, right? Hover your mouse over the right-hand column until a small black down arrow ↓ appears. That is the Select Column arrow. Click your mouse when the arrow appears. (You may also drag through the right-hand column from top to bottom.)
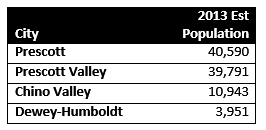
Your column will be selected. In the Table Tools>Layout tab>Alignment section>select Align Top Right icon. Your column heading and the numbers will move to the right of the table.
Add a Totals Row with a Formula
These four towns are called the Quad-Cities, and inquiring minds want to know the total population, but we don’t want to get out a calculator. Word has a few built-in formulas for our table.
First we need to add a row for our total. Click anywhere on the bottom row of our table. Right-click and select Insert>Insert Rows Below. A blank row of similar size and shape will be added below.(Notice you can also delete and shift cells or rows from this right-click menu.)

In the City column of our new bottom row, type “Quad-Cities Total.” Tab over (or click) to the bottom row of the Population column. In the Table Tools>Layout tab>Data section, select Formula


 We want to emphasize the total line, so let’s change a Border in our Table. With the table selected, go to Table Tools>Design tab>Border section. The default border is 1/2 point. Change the border to 3 point for an emphasis line. Now your mouse has changed to an Ink Pen icon. With this ink pen mouse, draw through the line above your totals row.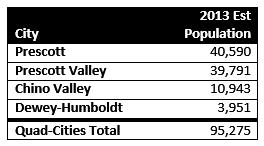
Review, Proof, and Update your Table
Now, go learn Excel, it’s much more fun and faster. Why? If you make a correction to your numbers, your total will not automatically update in MS Word. You need to click on the total number, right-click and select Update Field to adjust the total. (Excel does this automatically.)
Monday, August 31, 2015
Adding my Signature to a Letter for Emailing
I have moved all my blogs to my new website: https://helpfulofficetips.com/2015/08/31/adding-my-signature-to-a-letter-for-emailing/
From now on, all updates will be at the
new site, and all links will take you directly to that site. Please check
it out!
What’s a Signature Block?
First, you need to add a signature block to your letter for proper business format. A signature block appears below your last paragraph, has a closing, and your signature over your typed name. In a business letter, your title appears directly below your typed name.
To create this, at the end of your letter, drop down two lines with one or two Enters depending on your current Style. Type “Sincerely,” and press enter about four times to create room for a signature or emphasis for your name. Type your name as you sign it, for our example I will be “Joan Smith.”
Isn’t a typed name good enough?
A typed signature block is acceptable to recipients of most emailed letters. Sometimes you might want to use a script font to retype your name in the middle of the blank lines above the name typed in the normal font. Some script fonts are smaller, so use a bigger size for emphasis and legibility. For example here is a Freehand font in 24 point size:

What about a Real Signature?
Let’s say you need a “real” (actual a digital) signature. Take out a piece of plain white paper, regular 8 1/2 by 11 size white letter paper – the paper you use for a copy machine. Using a black Sharpie, create a large signature in the middle of the page. The large size will make the file more clear and legible when you resize it.

Use your scanner to create a black and white .jpg file. (Most office stores such as Staples or Office Depot have a print shop that can scan this for you for a small fee if you don’t have a scanner.) Save in a central, easy to find location. Save as Your Name Signature.jpg. Open the signature with photo editing software and crop it so that the empty edges of the white paper are left out, but your signature is still there. Resave the image.

To use your scanned signature, start with your cursor in the blank area of your signature block. On the Insert tab>Illustrations section>select Pictures. Browse for your scanned signature, then click Insert. Select the image of your signature, and grab a corner handle to adjust the size of your signature. When you click on your image, a small Layout Options box appears next to its top right corner. Click the Layout Options and select the bottom right choice, In Front of Text.

Now you may drag your signature image all over the page without affecting the text spacing. Drag and move your signature above your typed name.
If your signature has white space around it and blocks out the text, you need to make the white space transparent. In the Picture Tools tab>Color section>click on the Color drop-down arrow. From the menu, select Set Transparent Color. Your cursor will turn into an ink pen. Using the cursor, click on the white background of your signature. The white background will turn transparent and your text will show through it. Readjust size and location of your signature if necessary.

Now you can save your document as a pdf (File tab>Save as… File Type PDF). Your signature is there and no one can edit your document.
How do I sign a PDF?
 If someone emails you a pdf, you can sign the document with the free Adobe Reader software. Open the document with Adobe Reader. Simply click on the “Fill & Sign” tab on the upper right, and then “Place Signature.” The first time you do this, you will need to browse for your signature image. After using it once, Acrobat Reader will remember where your signature is until you change it.
Once you save this pdf, it will automatically add “-signed copy” to the end of the name. If you have pdf editing software, such as Adobe Acrobat, editing will not work on the saved document. You will need to edit the original, before the signature was added – so don’t delete that one.
Monday, July 20, 2015
Using Shortcut Keys to Select A Range
I have moved all my blogs to my new website: https://helpfulofficetips.com/2015/07/20/using-shortcut-keys-to-select-a-range/
From now on, all updates will be at the new site, and all links will take you
directly to that site. Please check it out!
Microsoft has developed several standard ways to select bits of text, objects, or files in most of their products. The methods below are specific to text but apply to other objects as well. After getting used to them in MS Office, try using them out to rearrange your desktop, or move multiple files from one folder to another.
- Drag: Drag by clicking on the first part, then holding the mouse button down as you drag to the end of your selection.
- Double-click: Double-click a word to select the word. Sometimes a double-clicking an item, such as tab on the ruler or a menu icon, will open a new window with more formatting choices. In Windows Explorer, double-clicking opens a folder or file.
- Triple-click: Triple-clicking a word will select the entire line of text or paragraph, whatever words fall between pressing "Enter" and pressing it again.
- Shift Click: Hold down your shift button. Start at the top of your range and click. Click again at the bottom of your range. This also works bottom to top - it is simply telling the computer select everything between my two clicks.
- Shift Click with Cursor: This is variation, if you don't want to use your mouse to drag. It's especially handy in MS Excel. Hold down Shift. Click at the top. Use the cursors or arrows on the right of your keyboard to move through your document. Release shift when you have selected your range.
- Ctrl Click: Select multiple items one at a time, with Ctrl click. If you get one item by mistake, Ctrl click again to deselect.
- Select All: Select everything in your document in most MS Office products from the Home tab>Select section>click the drop-down arrow next to Select. On the Select menu, click Select All. You may also Ctrl A for “All.”

Thursday, June 11, 2015
PowerPoint Photo Album Shortcut
I have moved all my blogs to my new website: https://helpfulofficetips.wordpress.com/2015/06/12/powerpoint-photo-album-shortcut/From now on, all updates will be at the new site, and all links will take you
directly to that site. Please check it out!
An office was putting on a spur of the moment open house and wanted the computer screens to show photos from the previous year. By spur of the moment, I mean 15 minutes from now. A problem? Not with PowerPoint’s built-in Photo Album shortcut.
To prep, get all your photos in one folder – I don’t think
there is a limit. The office I mentioned
had over one hundred. Also, pick some
music if you have any mp3 files handy.
That’s all you need. Oh, and a
PC. This shortcut is not available on
Macintosh.
Open PowerPoint and save your document as Year in Review
Photos or other appropriate name.
On the Insert tab>Images section>click on the Photo
Album dropdown arrow. Then select New
Photo Album.

The Photo Album window will appear.

·
Dragging through them all
·
Ctrl-click each one
·
Click on the first one. Hold down Shift and click on the last
one. This will select the entire range.
·
Ctrl-A to select all.
Now click Insert and PowerPoint will place the photos in
the Pictures in Album section. You may click
on the photo you want to change and use the buttons to change the order, the
orientation, the brightness or contrast.
Your photos are set, so In the Album Layout section,
select how many photos per page. If you
want one photo per page and for the photo to fill up the page, select Fit to
slide. Frame shape is another option,
although I usually use the default Rectangle.
In the Theme box, click browse and pick any theme. You can change this easily later, so just
pick the first one that catches your eye.
Now click Create and PowerPoint does all the tedious work
for you. You may need to add some text
to the first slide. Also, if you don’t
like the Design, go to the Design tab and pick one you do like.

Every slide show needs a
transition from slide to slide, so pick one. I usually use “Fade” because it is
professional and doesn’t draw attention to itself. Depending on your slides, you may want to
take this opportunity to use one of the obnoxious, er, I mean Dynamic Content transitions
like Orbit. To get to the unusual transitions,
click the down arrow in the Transition to This Slide section.

We will not be sitting at the computer for this show, so we
want the slides to advance automatically.
From the Transitions tab>Timing section, enter 5 seconds in the After
box. (Leave the On Mouse Click button
checked in case you want to advance the slides before the automatic timing.)
 The secret weapon in the Transitions tab is the Apply to
All button. Apply to All - ALWAYS DO THIS LAST AND ALWAYS DO IT AFTER
MAKING ANY CHANGES! This applies your
transition and timing to every slide.
Remember, you want people to look at your slides not your PowerPoint
transitions. Uniformity is good in this
case.
The secret weapon in the Transitions tab is the Apply to
All button. Apply to All - ALWAYS DO THIS LAST AND ALWAYS DO IT AFTER
MAKING ANY CHANGES! This applies your
transition and timing to every slide.
Remember, you want people to look at your slides not your PowerPoint
transitions. Uniformity is good in this
case.
Your Slide Show is complete now if you do not want to add
any music. Click on Slide Show
tab>From Beginning to see your masterpiece!
Is it a little
bland without background music? One more
simple step will fix that.
 Go to the first slide.
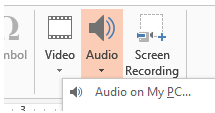
From the Insert tab>Media section, click on the arrow below Audio. Select Audio on my PC. Pick a song that sets the appropriate mood. Remember, earlier you saved your music in the same folder
as your presentation. Click insert and a
speaker icon will appear on your slide and it should be selected (if not,
select it).
Go to the first slide.
From the Insert tab>Media section, click on the arrow below Audio. Select Audio on my PC. Pick a song that sets the appropriate mood. Remember, earlier you saved your music in the same folder
as your presentation. Click insert and a
speaker icon will appear on your slide and it should be selected (if not,
select it).
The Audio Tools
tab will appear with the Playback tab. In the Audio Styles section select Play in
Background. This will automatically
change the settings to:
· Start
automatically with the current slide
·
Play Across Slides
· Loop until Stopped
· Hide the icon during the slide show

Review your Slide Show again
by clicking Slide Show tab>Start Slide Show section>From Beginning. You can always end the show with a right
click.

Once you have done this a few times, you should be able
to create a one hundred photo show in about five minutes.
Oh, and the office I mentioned, visitors loved the show
and thought we spent hours on it.
Subscribe to:
Posts (Atom)