Monday, September 16, 2013

Window(s) to My Documents - Moving Shortcuts into My Documents Folder

I have moved all my blogs to my new website: https://helpfulofficetips.wordpress.com/2013/09/16/a-windows-to-my-documents-moving-shortcuts-into-my-documents-folder/ From now on, all updates will be at the new site, and all links will take you directly to that site.  Please check it out!

In a previous post "Windows: Creating Shortcuts on your Desktop," I showed you how to move documents and folders to your Desktop.  That way, in the Explorer Window you could just click Desktop in Favorites and see your "favorites" - at least see a shortcut to them.

The problem is that leads to a very cluttered Desktop.  I only keep a few programs and shortcuts to my very, very favorite folders there.  I'd rather keep my real desk cluttered, not my virtual desk, right?

That why the Documents folder in Libraries is so helpful.  As I mentioned previously, DO NOT put your actual documents there - just a shortcut.  Otherwise, you'll end up with multiple versions of the same document, and who wants that?

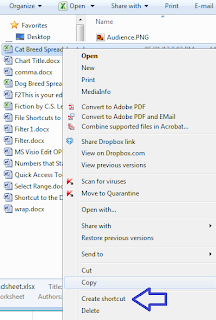
In Explorer, right-click your folder or document - I only use this for folders.

Select Create shortcut.  This will create a shortcut in the same folder.  Drag the new shortcut folder - NOT the original, the one that says "shortcut" into your Documents folder in Libraries.  You don't have to change to a new window; you may drag from right where you are.

Now click on Documents.  You will see your shortcut.  Now you may rename it and remove the word shortcut if you'd like.


The little shortcut arrow will be there to remind you.
MS Word - Adding File Name, Path, Revision Date to your Document

We are in a reorganize mode at work and trying to print out every current document that we use both internally and hand out to clients.  We realized that merely printing the documents wouldn't help if we couldn't go back and find the document.  So...  how do you show where the document is on your huge network drive?

For this example, let's put all the information in the footer.

Open the document.Double click on the Footer or Footer area.
Go to spot where you want your new information, probably above any existing footer.

File Name and Path
where to find the document on your computer


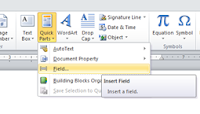
  • On the Insert tab>Text section>Quick Parts drop down, select Field
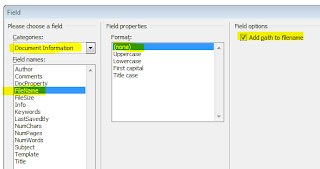
  • In the Categories drop down menu, select Document Information.
  • Then select FileName.  Format: None.
  • In the Field Options section, select “Add path to filename” and click OK.


This will add the path and file name to the document, as shown at the bottom of this blog.

Revised Date
the date of the last time the document was saved

Now, we don't want to have the date it was last printed which would always show today's date.  We want the last date the document was saved, usually when changes were made, in other words the last time "Revised."

  • Go to the spot in your footer where you want this date.
  • Type “Revised” and press space.
  • On the Insert tab>Text section>Quick Parts drop down, select Field
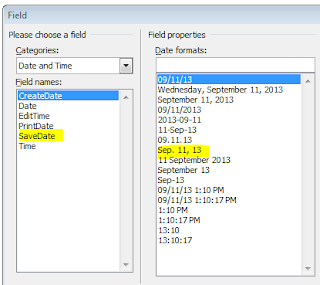
  • In the Field Window, pull down the Categories menu to Date and Time.
  • Select SaveDate (the last time the document was saved or revised).
  • For Date formats, select your favorite or your company's approved format.  For my company, that means “Mmm. d, yy” format.  For example, Dec. 25, 2013.


The last date saved in inserted in the document as the revised date.

Make all your formatting corrections to your new footer, and there you go.
My current footer looks something like this:


c:\AdminAssistTips\MS Word\Adding File Name Path Revision Date to Your Document.docx Revised Sep. 16, 13