Tuesday, November 26, 2013

Use Excel and Word's Mail Merge to Print Mailing Labels

I have moved all my blogs to my new website: https://helpfulofficetips.wordpress.com/2013/11/27/use-excel-and-words-mail-merge-to-print-mailing-labels/ From now on, all updates will be at the new site, and all links will take you directly to that site.  Please check it out!

First, create a basic mailing list in Excel of your friends and family.  You must include the headers for each column.  Here is an example:

Last First Address City ST Zip
Bennet Elizabeth 123 Pier Street Santa Monica CA 90401
Bennet Jane 2345 Colorado Avenue Santa Monica CA 90401
Bingley Charles 900 Wilshire Boulevard Westwood CA 90024
Darcy Fitzwilliam 601 N. Rodeo Drive Beverly Hills CA 90210


Save it and name it Mailing Labels.

Now open a new Word document  In the Mailings tab, click Start Mail Merge and select Labels. Have your box of labels handy and find the code.  Avery 5160 is the norm - that's the one with 30 labels per sheet.

To see your labels outlines, go to the Table Tools>Design tab that appeared in Word.  Click the Table Tools tab which appeared and select View Gridlines.

   
Now enter your "Merge Fields."  Put your cursor in the label.  Still on the Mailings tab, in the Write & Insert Fields section, select Insert Merge Field.  Click for the pull-down menu.  Select the merge fields and add the appropriate spacing.  (You can also add the spaces in later.)

<<First>> space <Last>>
<<Address>>
<<City>> comma space <<ST>> space space <<Zip>>

Your labels will look like this


Click Mailings tab>Write & Insert Fields section>Update Labels.


Now your labels will look like this:


To see your friends’ names, click Mailings tab>Preview Results section>Preview Results

You may adjust font, size, and spacing, use the first label only, then click Update Labels and your formatting will be copied to all labels.


Print one label on regular paper first, so you don’t waste the labels.  Most printers will have a little graphic that explains which side up or down, top or bottom.

Monday, November 11, 2013

MS Word: Resetting the Page Number in the Middle of your Document

I have moved all my blogs to my new website: https://helpfulofficetips.wordpress.com/2013/11/11/ms-word-and-resetting-the-page-number-in-the-middle-of-your-document/ From now on, all updates will be at the new site, and all links will take you directly to that site.  Please check it out!

A co-worker was struggling with starting the first page of Chapter 1 of a document being page 1.  The title page and table of contents were not supposed to be numbered.  What to do?  Word has the most annoying outline and page numbering systems ever invented IMHO.

Use a normal footer on your first page to start, even if that page is your title page or lists your contents.  It will default to page 1, of course.

Now, put your cursor at the end of your last non-numbered page, let's say the table of contents.  DO NOT put it at the beginning of Chapter 1 or you will end up with an extra (and blank) page 1 after these steps. 

Click on the Page Layout tab>Page Setup section>click on Breaks’ drop-down arrow.


Then click Next Page.


Now, you can select the page number on the next page and change its format.  Drag through the page number and right click.  Select “Format Page Numbers.”  In the Page Number Format window, select the “Start at:”  and “1” and OK.


Now go back to your page number on the title page and/or Table of Contents and delete or change the formatting to “i, ii, iii” for those sections.  (Everyone will be very impressed if you use little Roman numerals - just don't tell anyone you can't find the Roman numerals on your keyboard.)

Monday, September 16, 2013

Window(s) to My Documents - Moving Shortcuts into My Documents Folder

I have moved all my blogs to my new website: https://helpfulofficetips.wordpress.com/2013/09/16/a-windows-to-my-documents-moving-shortcuts-into-my-documents-folder/ From now on, all updates will be at the new site, and all links will take you directly to that site.  Please check it out!

In a previous post "Windows: Creating Shortcuts on your Desktop," I showed you how to move documents and folders to your Desktop.  That way, in the Explorer Window you could just click Desktop in Favorites and see your "favorites" - at least see a shortcut to them.

The problem is that leads to a very cluttered Desktop.  I only keep a few programs and shortcuts to my very, very favorite folders there.  I'd rather keep my real desk cluttered, not my virtual desk, right?

That why the Documents folder in Libraries is so helpful.  As I mentioned previously, DO NOT put your actual documents there - just a shortcut.  Otherwise, you'll end up with multiple versions of the same document, and who wants that?

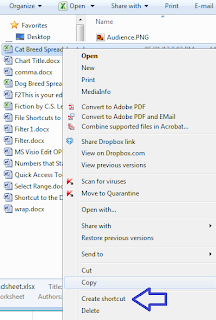
In Explorer, right-click your folder or document - I only use this for folders.

Select Create shortcut.  This will create a shortcut in the same folder.  Drag the new shortcut folder - NOT the original, the one that says "shortcut" into your Documents folder in Libraries.  You don't have to change to a new window; you may drag from right where you are.

Now click on Documents.  You will see your shortcut.  Now you may rename it and remove the word shortcut if you'd like.


The little shortcut arrow will be there to remind you.

MS Word - Adding File Name, Path, Revision Date to your Document

We are in a reorganize mode at work and trying to print out every current document that we use both internally and hand out to clients.  We realized that merely printing the documents wouldn't help if we couldn't go back and find the document.  So...  how do you show where the document is on your huge network drive?

For this example, let's put all the information in the footer.

Open the document.Double click on the Footer or Footer area.
Go to spot where you want your new information, probably above any existing footer.

File Name and Path
where to find the document on your computer


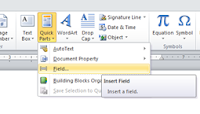
  • On the Insert tab>Text section>Quick Parts drop down, select Field
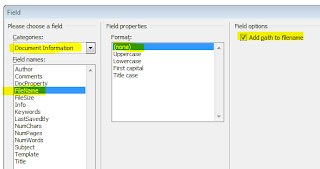
  • In the Categories drop down menu, select Document Information.
  • Then select FileName.  Format: None.
  • In the Field Options section, select “Add path to filename” and click OK.


This will add the path and file name to the document, as shown at the bottom of this blog.

Revised Date
the date of the last time the document was saved

Now, we don't want to have the date it was last printed which would always show today's date.  We want the last date the document was saved, usually when changes were made, in other words the last time "Revised."

  • Go to the spot in your footer where you want this date.
  • Type “Revised” and press space.
  • On the Insert tab>Text section>Quick Parts drop down, select Field
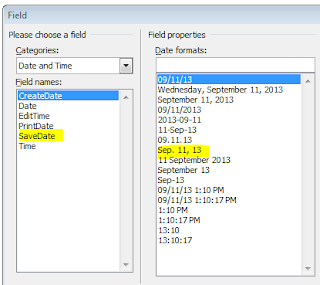
  • In the Field Window, pull down the Categories menu to Date and Time.
  • Select SaveDate (the last time the document was saved or revised).
  • For Date formats, select your favorite or your company's approved format.  For my company, that means “Mmm. d, yy” format.  For example, Dec. 25, 2013.


The last date saved in inserted in the document as the revised date.

Make all your formatting corrections to your new footer, and there you go.
My current footer looks something like this:


c:\AdminAssistTips\MS Word\Adding File Name Path Revision Date to Your Document.docx Revised Sep. 16, 13


Friday, June 28, 2013

Giving Your Assistant Permission to Set Appointments on Your Calendar in Outlook 2010

We have a policy in my office that we all have editing privileges to each calendar.  That way we can make appointments with clients for each other.  Why go through all this trouble?  If you don’t, every time you make an appointment for someone else, it will also show up on your calendar and you are invited to the appointment.

Here is how to give your coworkers Editor privileges to your calendar.  (You have to do it; your secretary can’t unless you give them your password, which is usually considered bad form in most work places.)

Open Outlook.  Click on Calendar in the left hand navigation pane.  Right click on My Calendar and select Properties.

Go to the Permissions tab.  To make this much easier in the future, click on the first name in the list which is Default.


In the Permissions section below, click on the drop down arrow and select Editor from the list.  Click Apply at the bottom.  Now, anyone with whom your share your calendar will be an Editor.  You may change that by following the same procedure and switching the Permission Level.

So, now let's add the members of your staff who set appointments on your calendar.  Click Add.  Type in the name of your coworker and click OK.  That person will now be set as an Editor.  When you are finished, click OK to close the window.  The new editors will be able to see your calendar, make appointments, and cancel appointments.

You may still keep some appointments private, by clicking the little lock icon when you make or edit the appointment.  It’s in the Appointment tab>Tags section, next to Categorize.  
As a courtesy, after I make an appointment on someone’s calendar, I always invite them, too.  That way they get an email reminder, but they do not have to accept the appointment, it is already there.


Thursday, April 4, 2013

PowerPoint YouTube Video Won't Play: "You Must Install a Later Version of Flash Player." Really?


June 10, 2015 Update - YouTube recently removed the "Old Embed Code" feature.  To use the new embed code, please see my recent post here.

This post only applies to PowerPoint 2010, as the Insert Video from Website option is no longer available in PowerPoint 2013.  Click here for a link to a good, and extremely complicated, to add that functionality back into 2013.

I thought I had the put-a-youtube-video-into-PowerPoint thing down with my blog PowerPoint and YouTube - Automatically Starting the Video.  Then Microsoft did one of its updates.  Suddenly everyone began getting this message:


Oh, just install a later version of Adobe Flash Player, right?  Wrong.

I thought it was an issue with our office computers’ security, so I had IT come to my office.  They tried five fixes over five weeks.  Nothing.  I brought in my home laptop.  Same issue.  I uninstalled Flash Player, reinstalled Flash Player, still nothing.   I have a presentation in two weeks, so this was definitely a problem.  I emailed IT one more time and they sent me the magic fix.

In my previous blog I told you how to add the autoplay feature in the html.  Now we’re going to remove a feature.  Here is the note from my IT department:
Now, using the Old Embed Code, paste the code into the PowerPoint, but before you click ok you need to remove the two items related to Version 3 (see highlighted example). Make sure you delete from everything from semi-colon to semi-colon. 

<object width="560" height="315"><param name="movie" value="http://www.youtube.com/v/wf_IIbT8HGk?hl=en_US&amp;version=3&amp;rel=0"></param><param name="allowFullScreen" value="true"></param><param name="allowscriptaccess" value="always"></param><embed src="http://www.youtube.com/v/wf_IIbT8HGk?hl=en_US&amp;version=3&amp;rel=0" type="application/x-shockwave-flash" width="560" height="315" allowscriptaccess="always" allowfullscreen="true"></embed></object>
Now, my IT department thought the cat video was pretty funny (it was, but no, I do not condone fat cats).  I prefer a little more sophistication, so my favorite YouTube video is the Warsaw, Poland, cast of Les Miserables singing “One Day More” as a flashmob at a fancy mall.  Here is the old embed code:

<object width="1280" height="720"><param name="movie" value="http://www.youtube.com/v/DXgCrhIevwU?version=3&amp;hl=en_US&amp;rel=0"></param><param name="allowFullScreen" value="true"></param><param name="allowscriptaccess" value="always"></param><embed src="http://www.youtube.com/v/DXgCrhIevwU?version=3&amp;hl=en_US&amp;rel=0" type="application/x-shockwave-flash" width="1280" height="720" allowscriptaccess="always" allowfullscreen="true"></embed></object>

So first, we are going to delete the version stuff:

<object width="1280" height="720"><param name="movie" value="http://www.youtube.com/v/DXgCrhIevwU?;hl=en_US&amp;rel=0"></param><param name="allowFullScreen" value="true"></param><param name="allowscriptaccess" value="always"></param><embed src="http://www.youtube.com/v/DXgCrhIevwU?;hl=en_US&amp;rel=0" type="application/x-shockwave-flash" width="1280" height="720" allowscriptaccess="always" allowfullscreen="true"></embed></object>

Now, let’s add the autoplay=1.

<object width="1280" height="720"><param name="movie" value="http://www.youtube.com/v/DXgCrhIevwU?;hl=en_US&amp;rel=0;autoplay=1"></param><param name="allowFullScreen" value="true"></param><param name="allowscriptaccess" value="always"></param><embed src="http://www.youtube.com/v/DXgCrhIevwU?;hl=en_US&amp;rel=0; autoplay=1" type="application/x-shockwave-flash" width="1280" height="720" allowscriptaccess="always" allowfullscreen="true"></embed></object>

Now click Insert tab>Video>Video from web site to put into PowerPoint.


It may take a few seconds.  Stretch it out to the size you want, then double click the big black rectangle to play.  And enjoy the music.


Wednesday, April 3, 2013

Excel 2010: Finding a Broken Link


I have several Excel files that have been edited by others over the years.  Whenever I open some of these spreadsheets, I get the broken link window.  I can click on Edit Links, but all that gives me is a window saying “Error: Source no found” for the broken link.


I tried going to the Formulas tab>Show Formulas.  This turns all the formulas into text and spreads out the column width so I can see the formulas, but I still didn't find the broken links.

I googled “find broken links” and went to Microsoft’s community page.  Here a wonderful contributor Dave Peterson (thanks again, Dave) posted a link to an add-in that he had discovered:

I'd use Bill Manville's FindLink program:


I was hesitant about grabbing an unknown zip file, but everyone on the community board was raving about it, so I tried.  I had never looked at the Add-Ins tab, but now I had one called Find Links.  I clicked, entered a few words from the error message and it found the broken link.  Someone had put information on Sheet2 of the workbook.  I hadn’t thought to look there.  

(Quick tip:  If you are using more than one sheet, make sure you give them names other than Sheet1, Sheet2 and Sheet3.)

I deleted the year old information on Sheet2, and saved the spreadsheet.  When I reopen it, no more broken link message!

Saturday, January 19, 2013

PowerPoint and YouTube – Errors and Autoplay


June 10, 2015 Update:  YouTube recently removed the "Old Embed Code" function.  For my newest post regarding this issue, click here.

August 31, 2013 Update:  I had written this blog in January 2013, and at the time everything worked.  I was about to redo my presentation, but this time the video wouldn't embed.  PowerPoint gave me an error message that it couldn't embed the video using THIS embed code (which worked fine seven months ago).  Ah... Microsoft.

After lots of Googling (and no Binging) I found this answer on a Microsoft Answers site.  Anyone can find it as long as keep reading and scrolling down and down and down.

Short answer: in the html embed code, make these changes twice.


www.youtube.com becomes http://www.youtube.com
version=3 becomes version=2

And now back to my original blog about AutoPlay:

I am doing a beginning PowerPoint workshop at the University.  I am going to show a group how to embed a YouTube video.  Of course, the video only starts on a mouse click, even though you select Start Automatically in the Playback tab>Video Options>Start drop down.  Now what?  Google, of course.
The first thirty suggestions I found merely suggest using a different product than PowerPoint (no, I’m not going to use your link and download something unknown to my computer) or use a “free” download to hack YouTube (also, not a great idea).

Then, ta da… a site that shows helpful html code for YouTube.  When you embed a video in PowerPoint (another lesson for another day), you have to copy the html code.  I always “Use Old HTML Code,” by the way.  This site “YouTube Embed Code:  Everything You Ever Wanted to Know” shows you the sneaky, and fairly easy codes to add.

For my situation, all you have to do is go to the end of the link in the first line of code and add:

; autoplay=1
to the code.

Long story short, I found an ultra adorable video of a little boy and his dad having fun with Oreos.  I want to embed it.  I click Share/Embed/Use Old Embed Code.  I copy the code.  In PowerPoint, go to the Insert tab>Media section>Video>Video from Web Site window and paste the code into PowerPoint.  Just before the first quote and right-angle-bracket, I’m going to change the original code from this:

<object width="960" height="720"><param name="movie" value="http://www.youtube.com/v/Oe6lBGO6OSk?version=2&amp;hl=en_US">

to this: 

<object width="960" height="720"><param name="movie" value="http://www.youtube.com/v/Oe6lBGO6OSk?version=2&amp;hl=en_US;autoplay=1">

Click Insert. It works.  If only I’d known this about ten PowerPoint shows previously.

And if you’re curious, click here to see the cute video.  Does anyone know the language?