I have moved all my blogs over to my new website, HelpfulOfficeTips.com.
I hope you will join me. I am updating and linking each post, one by one. I hope to see you there!
Friday, May 31, 2019
Saturday, April 13, 2019
Automatically Playing an Embedded YouTube Video in PowerPoint 2019
I have moved all my blogs to my new website: https://helpfulofficetips.com/2019/04/13/automatically-playing-an-embedded-youtube-video-in-powerpoint-2019/ From now on, all updates will be at the new site, and all links will take you directly to that site. Please check it out!
PowerPoint 2019 can now embed and automatically play a YouTube video during your slide show! (Over the last few years Microsoft and Google have changed this process many, many times. We will see how long this update and cooperation lasts.)
These instructions work as of April 13, 2019. Tomorrow, you may be on your own.
For PowerPoint 2016 and earlier versions, click here: https://helpfulofficetips.com/2016/08/02/automatically-playing-an-embedded-youtube-video-in-powerpoint-2016/
YouTube
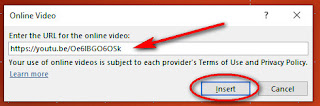
Using the internet, find your YouTube video. (Watch the entire video, start to finish, to be sure it is appropriate for your presentation.) Pause the video (because it’s annoying when it’s running and you’re trying to think). If you want to practice, here is the URL for a really cute Oreo commercial from India that I show to all my classes: https://youtu.be/Oe6lBGO6OSk
Click on the word Share below the video. The Share window will appear. In the bottom “Share a link” portion, you will see the URL with the word “COPY.”

Click “COPY.” Copy will place the video’s URL in the computer’s clipboard memory until you need it or copy something else.
PowerPoint 2019
Now return to PowerPoint and the slide where you want to play a YouTube video. Go to the Insert tab. On the far right is the word “Video” with a drop-down arrow. Click Insert tab>Media section>Video>Online Video.

The Online Video window will appear. Click inside the URL box and right-click>Paste or press Ctrl-V to paste the YouTube video URL. Click Insert to insert the video-link into your slide.
Your video will appear on the slide. Drag the corners to fit the slide, usually to the edges. (To drag the corners, click on the top left corner and hold the mouse button down. Move or “drag” the mouse to the top edge of the slide. Do the same for the bottom right corner.)
Notice that when you have selected the video, new special tabs appear in the menu ribbon. There are two Video Tools tabs: Format and Playback. When you inserted the video, PowerPoint selected the Video Tools>Format tab, in case you want to recolor, add a frame or crop the video. Instead, click the Video Tools>Playback tab. Remember, these menu tabs only appear if you have selected your video.

Play "Automatically" or "In Click Sequence"
The important option in the Video Tools>Playback tab is in the Video Options>Start. Click the drop-down menu next to Start.
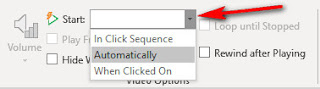
Three options will appear.
For me, I would probably click either In Click Sequence if I want to introduce the video or Automatically if I used a previous slide to set the stage.
Timings and order may be changed via the Animations Pane, but that is another lesson!
PowerPoint 2019 can now embed and automatically play a YouTube video during your slide show! (Over the last few years Microsoft and Google have changed this process many, many times. We will see how long this update and cooperation lasts.)
These instructions work as of April 13, 2019. Tomorrow, you may be on your own.
For PowerPoint 2016 and earlier versions, click here: https://helpfulofficetips.com/2016/08/02/automatically-playing-an-embedded-youtube-video-in-powerpoint-2016/
YouTube
Using the internet, find your YouTube video. (Watch the entire video, start to finish, to be sure it is appropriate for your presentation.) Pause the video (because it’s annoying when it’s running and you’re trying to think). If you want to practice, here is the URL for a really cute Oreo commercial from India that I show to all my classes: https://youtu.be/Oe6lBGO6OSk
Click on the word Share below the video. The Share window will appear. In the bottom “Share a link” portion, you will see the URL with the word “COPY.”

Click “COPY.” Copy will place the video’s URL in the computer’s clipboard memory until you need it or copy something else.
PowerPoint 2019
Now return to PowerPoint and the slide where you want to play a YouTube video. Go to the Insert tab. On the far right is the word “Video” with a drop-down arrow. Click Insert tab>Media section>Video>Online Video.

The Online Video window will appear. Click inside the URL box and right-click>Paste or press Ctrl-V to paste the YouTube video URL. Click Insert to insert the video-link into your slide.

Your video will appear on the slide. Drag the corners to fit the slide, usually to the edges. (To drag the corners, click on the top left corner and hold the mouse button down. Move or “drag” the mouse to the top edge of the slide. Do the same for the bottom right corner.)
Notice that when you have selected the video, new special tabs appear in the menu ribbon. There are two Video Tools tabs: Format and Playback. When you inserted the video, PowerPoint selected the Video Tools>Format tab, in case you want to recolor, add a frame or crop the video. Instead, click the Video Tools>Playback tab. Remember, these menu tabs only appear if you have selected your video.

Play "Automatically" or "In Click Sequence"
The important option in the Video Tools>Playback tab is in the Video Options>Start. Click the drop-down menu next to Start.

Three options will appear.
- In Click Sequence: The slide will pop-up showing a still frame with the YouTube play button in the middle. To start the video, click the mouse anywhere (or press the space bar or forward on your pointer), and the video will begin.
- Automatically: As soon as you begin this slide, the video will begin. This is great for a self-running show, but you will not get a chance to introduce the video.
- When Clicked on: You will need to move your cursor to the video and click for the video to begin. You do not need to click exactly on the YouTube play button as you did in the past.
For me, I would probably click either In Click Sequence if I want to introduce the video or Automatically if I used a previous slide to set the stage.
Timings and order may be changed via the Animations Pane, but that is another lesson!
Friday, June 15, 2018
MS Office / Word / Excel / PowerPoint: Customize Your Quick Access Toolbar
I
have moved all my blogs to my new website: https://helpfulofficetips.com/2018/06/15/ms-office-word-excel-powerpoint-customize-your-quick-access-toolbar/ From now on, all
updates will be at the new site, and all links will take you directly to that
site. Please check it out!
When you first open any document in MS Word, MS Excel, or MS PowerPoint, you should notice there are little icons in the very top left, called the Quick Access Toolbar. Microsoft puts some shortcuts here, like Save and Print, but they don’t really know what you need or use the most, do they?
Open MS Word. Your Quick Access Toolbar may already look different than mine depending on when you installed MS Office. Give yourself a quick tour by hovering your mouse over each item to see what it does.

The standard Word default is four icons.
• “Save” is the small diskette
• “Undo” is the back-facing arrow
• “Redo” is the circular arrow
• “Customize” is the drop-down arrow with the small bar over it – I like to call this icon “more choices.”
Those are great choices… for a beginner. Let’s click that Customize button and see what happens. When we click Customize, “more choices” pop up below. You can quickly click on these items to add choices to your Quick Access Toolbar. Click on “Open” to add the File tab>Open command to yours.

Look at your Quick Access Toolbar now. You will see a file folder icon has been added to your Quick Access Toolbar.
I like to keep my File tab icons together, so while that is a good shortcut, it doesn’t really let you determine the location of the icons.
Let’s use “More Commands” instead of selecting them from this list. Click “Customize>More Commands…” from the drop-down menu. This brings up the Options window and goes right to “Quick Action Toolbar” menu.

Let’s take a little tour of the Customize the Quick Access Toolbar window. Circled red, you will see that Word defaults to the “Popular Commands” choices. These are the items commonly added to the menu. You’ll see that “Redo,” “Save,” and “Undo” are already shown.
In the center circled green are the “Add>>” and “<<Remove” buttons. We added “Open” earlier, as shown on the right. If I click “<<Remove” it will disappear from my custom toolbar.
On the right circled blue are the up and down arrows. Since I clicked on “Open,” I can move it higher up or down the list by clicking the up and down arrows. This is confusing since the actual toolbar goes left to right, but you get the idea.
 I would like my “Open” icon to be before “Save.” I will click the up arrow three times. Try it at home. This does not make any changes to the actual Quick Access Toolbar until you click OK. Do it.
Got it? Let’s make some more changes. Go back to Customize>More Commands.

I never hung out with the “popular” crowd, so I don’t really want only the “Popular Commands.” Click the drop-down arrow next to “Popular Commands.” A new menu appears with choices such as “All Commands” and then by tab, such as “File Tab” or “Home Tab.” Choose “All Commands” so we can see everything!

A list in alphabetical order appears, sort of like a genie giving you multiple choices for your wish. The first tab is called “<Separator>. Let’s add that. A <Separator> will turn into a small vertical line once we press OK. Move the word <Separator> up two clicks so that it in between our file commands and our undo-redo commands. Here’s what it will look like:

Scroll down to the “Qs” and find “Quick Print.” Add it to your Quick Access Toolbar. “Quick Print” does just what it sounds like. It takes your document with your current print settings and sends it to the last printer you used.
Sometimes you want to see what it will look like first, though, right? Let’s add a Preview button. “Preview and Print” is a command that takes us to the Preview screen. If we like what we see, we can print from that screen. Choose “Preview and Print.”
Add another <Separator> above Quick Print so that your print commands are separated from Undo and Redo. Does yours look like this now?

There are a few more “File tab” commands I like, so let’s find change “All Commands” to “File Tab.”

From the File tab choices, select “Close File,” “New from Template,” and one of my favorites: “Publish as PDF or XPS.” (Don’t worry about “XPS” – no one uses that Microsoft format.)
 Use the up and down arrows to put them in this order:
New from Template
Open
Save
Publish as PDF or XPS
Close File
<Separator>
Undo
Redo
<Separator>
Quick Print
Preview and Print
Once it is all set up, click OK, and your Quick Access Toolbar will look like this:
Now when you are working in Word, you have all your (or my) most used commands available with a quick click. Give it a month or so, then come back to the Customize button and make any changes that you want. This is your Quick Access Toolbar, so make it just the way you want it.
Friday, June 8, 2018
MS Word: Insert Date and Automatically Update
I
have moved all my blogs to my new website: https://helpfulofficetips.com/2018/06/08/ms-word-insert-date-and-automatically-update/ From now on, all updates will be at the new site, and all
links will take you directly to that site. Please check it out!
Your computer knows what day (or date) it is, right? Instead of typing the date in Word, why not let the computer put the current date in for you?
Insert Date
In MS Word, the Insert tab has lots of handy quick shortcuts to insert pictures, tables, links to the internet, and symbols. It also can quickly insert today’s date in the format you choose. Look to the left of the Insert tab in the Text section and you will see a small calendar/clock icon. That’s what you use to insert the date.

Pick the spot on your Word document where you want the date, then click Insert tab>Text section>Date & Time.
This brings up the Date & Time window with more than a dozen choices for date and time format.

For most word processing uses, let’s spell out the month, then show the date and year, like this:
January 1, 2018
Set As Default
Select that format from your menu by clicking it, but don’t click OK yet! Notice the bottom of the Date & Time window. Since this format is the one we will use the most often, click the “Set As Default” button. This date format will now be MS Word’s favorite. Next time you use the Insert tab>Text section>Date & Time button, this format will be highlighted in the Date and Time window.
Update Automatically (or Not)
Now look at the little checkmark next to “Update Automatically.” When that box is checked, Word will insert a date “field” into your document. This date field is more than a group of letters showing today’s date. The field will update every time you open or print your document. That means your paper will always have the most current date.
Do you want it to update automatically? Usually, you do so you can tell when you printed a document or keep the date of a letter current. If this is a legal document, you may wish to keep the original date only and never update it. That’s up to you, but don’t always use “update automatically” automatically. Think about it first.
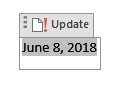 For today’s exercise, be sure “Update Automatically” is checked, then click OK. Word places today’s date into your document as a date field. Click on the date, and the entire date field will be highlighted with the word “Update” above it. You can’t change the date without deleting the date field and starting over. click anywhere off the date, and it looks like normal text, right?
Save and Check Back Tomorrow
Save the document and open it tomorrow, and tomorrow’s date will show up. Open it next year, and the current date will always show up. (If you save your document as a PDF, the date on your PDF will be frozen on that date forever.)
Save the document and open it tomorrow, and tomorrow’s date will show up. Open it next year, and the current date will always show up. (If you save your document as a PDF, the date on your PDF will be frozen on that date forever.)
Thursday, October 26, 2017
Excel Basics
I
have moved all my blogs to my new website: https://helpfulofficetips.com/2017/10/27/excel-basics/ From now on, all updates will be at the new site, and all
links will take you directly to that site. Please check it out!
I am a guest blogger on Noobie.com. They asked me to create some new-to-Excel posts for beginners. Just click the links below to go right to those lessons:
Excel Spreadsheet Basics Everyone Should Know: a tour of Excel, discussion of the cursors, and how to move around
Formatting Cells in Excel For a Better Understanding of Information: basic formatting
Excel Dates | How to Format Dates in Excel: use Excel's formatting shortcuts and more advanced formatting features to make your dates just the way you want them.
Excel Formulas and Dollar Format: create a simple spreadsheet multiplying quantity and price to get the cost, plus adding up the sales
Excel Tables | How To Format Excel Tables with Total Sort and Filter: format information as a table so you can sort and filter
How To Create Charts and Graphs in Excel: make your numbers visual with a chart or graph
Friday, September 8, 2017
MS Word: Introduction Lessons
I
have moved all my blogs to my new website: https://helpfulofficetips.com/2017/09/08/ms-word-introduction-lessons/
From now on, all updates will be at the new site, and all
links will take you directly to that site. Please check it out!
I teach an Introduction to MS Windows class for a community education program. Noobie.com asked me to type up those lessons for their blog site. You may find some of them helpful, so here are the links:
Thursday, July 6, 2017
Windows: Some Beginner Lessons
I have moved all my blogs to my new website: https://helpfulofficetips.com/2017/07/06/windows-some-beginner-lessons/
From now on, all updates will be at the
new site, and all links will take you directly to that site. Please check
it out!
I am a guest-writer on a website that teaches tech, and I designed a few lessons for brand new Windows computer users. For novices, I'd recommend reviewing them in order for the best learning experience. If you have some basic knowledge of Windows, pick and choose.
- Windows 10 Basics: Boot Up, Restart, Sleep, and Shut Down
- Windows Taskbar
- Learning to Save a Document in Notepad
- Windows File Explorer: Search, Create Folders, Move and Rename Files
- Windows PC Memory: This PC, Adjust Windows, File Extensions
- Windows: USB Drives, Phone, Camera and Memory Cards
Subscribe to:
Posts (Atom)