I
have moved all my blogs to my new website: https://helpfulofficetips.com/2018/06/15/ms-office-word-excel-powerpoint-customize-your-quick-access-toolbar/ From now on, all
updates will be at the new site, and all links will take you directly to that
site. Please check it out!
When you first open any document in MS Word, MS Excel, or MS PowerPoint, you should notice there are little icons in the very top left, called the Quick Access Toolbar. Microsoft puts some shortcuts here, like Save and Print, but they don’t really know what you need or use the most, do they?
Open MS Word. Your Quick Access Toolbar may already look different than mine depending on when you installed MS Office. Give yourself a quick tour by hovering your mouse over each item to see what it does.
The standard Word default is four icons.
• “Save” is the small diskette
• “Undo” is the back-facing arrow
• “Redo” is the circular arrow
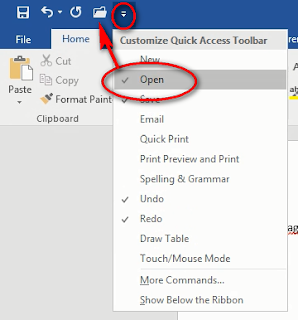
• “Customize” is the drop-down arrow with the small bar over it – I like to call this icon “more choices.”
Those are great choices… for a beginner. Let’s click that Customize button and see what happens. When we click Customize, “more choices” pop up below. You can quickly click on these items to add choices to your Quick Access Toolbar. Click on “Open” to add the File tab>Open command to yours.
Look at your Quick Access Toolbar now. You will see a file folder icon has been added to your Quick Access Toolbar.
I like to keep my File tab icons together, so while that is a good shortcut, it doesn’t really let you determine the location of the icons.
Let’s use “More Commands” instead of selecting them from this list. Click “Customize>More Commands…” from the drop-down menu. This brings up the Options window and goes right to “Quick Action Toolbar” menu.
Let’s take a little tour of the Customize the Quick Access Toolbar window. Circled red, you will see that Word defaults to the “Popular Commands” choices. These are the items commonly added to the menu. You’ll see that “Redo,” “Save,” and “Undo” are already shown.
In the center circled green are the “Add>>” and “<<Remove” buttons. We added “Open” earlier, as shown on the right. If I click “<<Remove” it will disappear from my custom toolbar.
On the right circled blue are the up and down arrows. Since I clicked on “Open,” I can move it higher up or down the list by clicking the up and down arrows. This is confusing since the actual toolbar goes left to right, but you get the idea.
 I would like my “Open” icon to be before “Save.” I will click the up arrow three times. Try it at home. This does not make any changes to the actual Quick Access Toolbar until you click OK. Do it.
Got it? Let’s make some more changes. Go back to Customize>More Commands.
I never hung out with the “popular” crowd, so I don’t really want only the “Popular Commands.” Click the drop-down arrow next to “Popular Commands.” A new menu appears with choices such as “All Commands” and then by tab, such as “File Tab” or “Home Tab.” Choose “All Commands” so we can see everything!
A list in alphabetical order appears, sort of like a genie giving you multiple choices for your wish. The first tab is called “<Separator>. Let’s add that. A <Separator> will turn into a small vertical line once we press OK. Move the word <Separator> up two clicks so that it in between our file commands and our undo-redo commands. Here’s what it will look like:
Scroll down to the “Qs” and find “Quick Print.” Add it to your Quick Access Toolbar. “Quick Print” does just what it sounds like. It takes your document with your current print settings and sends it to the last printer you used.
Sometimes you want to see what it will look like first, though, right? Let’s add a Preview button. “Preview and Print” is a command that takes us to the Preview screen. If we like what we see, we can print from that screen. Choose “Preview and Print.”
Add another <Separator> above Quick Print so that your print commands are separated from Undo and Redo. Does yours look like this now?
There are a few more “File tab” commands I like, so let’s find change “All Commands” to “File Tab.”
From the File tab choices, select “Close File,” “New from Template,” and one of my favorites: “Publish as PDF or XPS.” (Don’t worry about “XPS” – no one uses that Microsoft format.)
New from Template
Open
Save
Publish as PDF or XPS
Close File
<Separator>
Undo
Redo
<Separator>
Quick Print
Preview and Print
Once it is all set up, click OK, and your Quick Access Toolbar will look like this:
Now when you are working in Word, you have all your (or my) most used commands available with a quick click. Give it a month or so, then come back to the Customize button and make any changes that you want. This is your Quick Access Toolbar, so make it just the way you want it.


