For this example, let's put all the information in the footer.
Open the document.Double click on the Footer or Footer area.
Go to spot where you want your new information, probably above any existing footer.
File Name and Path
where to find the document on your computer

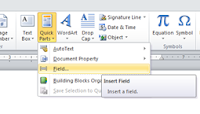
- On the Insert tab>Text section>Quick Parts drop down, select Field
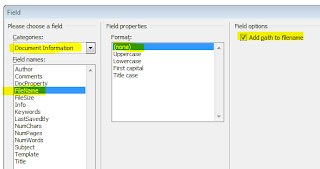
- In the Categories drop down menu, select Document Information.
- Then select FileName. Format: None.
- In the Field Options section, select “Add path to filename” and click OK.

This will add the path and file name to the document, as shown at the bottom of this blog.
Revised Date
the date of the last time the document was saved
Now, we don't want to have the date it was last printed which would always show today's date. We want the last date the document was saved, usually when changes were made, in other words the last time "Revised."
- Go to the spot in your footer where you want this date.
- Type “Revised” and press space.
- On the Insert tab>Text section>Quick Parts drop down, select Field
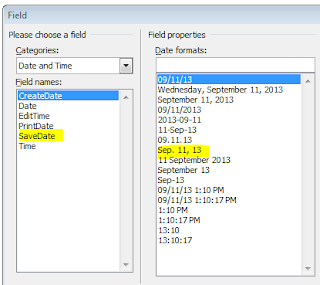
- In the Field Window, pull down the Categories menu to Date and Time.
- Select SaveDate (the last time the document was saved or revised).
- For Date formats, select your favorite or your company's approved format. For my company, that means “Mmm. d, yy” format. For example, Dec. 25, 2013.


The last date saved in inserted in the document as the revised date.
Make all your formatting corrections to your new footer, and there you go.
My current footer looks something like this:
c:\AdminAssistTips\MS Word\Adding File Name Path Revision Date to Your Document.docx Revised Sep. 16, 13
This comment has been removed by a blog administrator.
ReplyDelete