I have moved all my blogs to my new website: https://helpfulofficetips.com/2015/09/10/inserting-and-formatting-a-table-with-a-formula-in-ms-word/
From now on, all updates will be at the
new site, and all links will take you directly to that site. Please check
it out!
I was recently teaching a MS Word workshop and ran out of time to teach about inserting a table, so here is that lesson. I was going to use it as an introduction to Excel, with a subtitle: why-tables-are-easier-in-Excel-than-Word. Sometimes, though, you just need a tiny table in the middle of your document without inserting a spreadsheet, so Microsoft has included some basic table functions in Word.
First, let’s define a table using spreadsheet terms. This will help when we transition to Excel. A table is a grid of cells laid out in rows and columns. Rows go across horizontally and columns go up and down vertically. Memorize that while I wait.
Insert and Create your Table
Ready, now place your cursor where you want the table. You’ll be able to move it later, so just give it a good guess for now.

The arrow in the illustration points to the text above the grid. It will change from “Insert Table” to a description of your table, 2x5 Table, when you have our chosen layout selected. When you click on the grid square two columns and five rows down, Word inserts a two column, five row table in your document.
All columns are spaced evenly between the current margins and the rows are spaced evenly based on your current line spacing.
Add Text and/or Numbers
Let’s add data to your Table. You may click, tab, or cursor to go from cell to cell. (A not-so-subtle reminder that numbers have to be checked for typos. Spell-check doesn’t help here.)
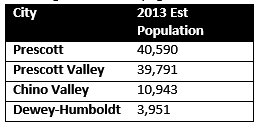
I recently moved to a new town, so I’m going to use US Census Bureau population estimates from the neighboring communities. Just type the information, starting with a descriptor in the top cells; we’ll format it later.
City
|
2013
Est Population
|
Prescott
|
40,590
|
Prescott
Valley
|
39,791
|
Chino
Valley
|
10,943
|
Dewey-Humboldt
|
3,951
|

Formatting your Table with Table Styles
Now let’s make it easier on the eyes with some formatting. When making changes to the format of your entire table, always select the table first. When selected, a small “Move” arrow group will appear on the top left corner. Select your table, then on the Home tab>Styles section> select No Spacing to get rid of any strange formatting, like double-spacing. Do this as a matter of habit.
Hopefully, you noticed that when you select your table, the Table Tools tab appears with two tabs: Design and Layout. Let’s select a pre-designed style. On the Tables/Design tab>Tables Styles section>click the more choices drop-down arrow. Let’s pick a simple and bold style today. Scroll down to the black header, horizontal borders, with no vertical lines inside.


Resize and Move your Table
Now grab the “Move” arrow on the top left and drag your table to the right side of the page. Your words will automatically wrap around it.
Align your Text or Numbers within your Table
In a table, you can set each cell, each row, or each column so that is aligned up, down or center, and right, left, or center. Click on the “City” cell. In the Table Tools>Layout tab>Alignment section>there are nine alignment choices. For “City,” select Align Bottom Left icon.

Numbers and their headings should always be right-aligned. So we want the entire right-hand column aligned to the right, right? Hover your mouse over the right-hand column until a small black down arrow ↓ appears. That is the Select Column arrow. Click your mouse when the arrow appears. (You may also drag through the right-hand column from top to bottom.)
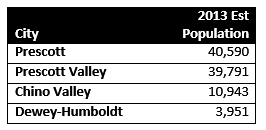
Your column will be selected. In the Table Tools>Layout tab>Alignment section>select Align Top Right icon. Your column heading and the numbers will move to the right of the table.
Add a Totals Row with a Formula
These four towns are called the Quad-Cities, and inquiring minds want to know the total population, but we don’t want to get out a calculator. Word has a few built-in formulas for our table.
First we need to add a row for our total. Click anywhere on the bottom row of our table. Right-click and select Insert>Insert Rows Below. A blank row of similar size and shape will be added below.(Notice you can also delete and shift cells or rows from this right-click menu.)

In the City column of our new bottom row, type “Quad-Cities Total.” Tab over (or click) to the bottom row of the Population column. In the Table Tools>Layout tab>Data section, select Formula


 We want to emphasize the total line, so let’s change a Border in our Table. With the table selected, go to Table Tools>Design tab>Border section. The default border is 1/2 point. Change the border to 3 point for an emphasis line. Now your mouse has changed to an Ink Pen icon. With this ink pen mouse, draw through the line above your totals row.
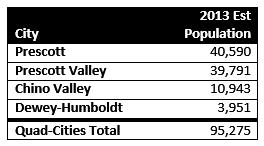
Review, Proof, and Update your Table
Now, go learn Excel, it’s much more fun and faster. Why? If you make a correction to your numbers, your total will not automatically update in MS Word. You need to click on the total number, right-click and select Update Field to adjust the total. (Excel does this automatically.)
No comments:
Post a Comment